❤2016-2018 In Colors❤

DSC_2342w

The 2016-2018 In Colors are just fabulous!  Love them!  I am showcasing the florals here – Peekaboo Peach, Flirty Flamingo, and Sweet Sugarplum.  Some of the new greetings are pretty awesome, too.  The birthday greeting is a single stamp “Stylized Birthday” and that great thank you is from “Thankful Thoughts”.

DSC_2343w

This greeting is also part of “Thankful Thoughts”, and the flowers, leaves and splatter are all from “Swirly Bird”.  This is such a great card for many sentiments.  We made it as a welcome card at my church’s card ministry this week, and it has been one of the most popular choices in my Card Buffet classes this week.

Thanks for looking!  Have a great holiday weekend!

>

Chris_buckeye_signature_rose_final

Playful Pals Owl

CCMC413

We have a sketch this week at Create with Connie and Mary, and it is open to so many interpretations.  I was having fun with my “Playful Pals” set this week, so I made some baby cards.  The first one goes with the sketch.

DSC_2337w

The branch pieces are from the Tree Builder Punch, and the greeting is from “Thoughtful Banners”.  The greeting is punched with our great new Duet Banner Punch.

DSC_2338w

This is the version of the card that we are making in Card Buffet this week.  I like the combination of Soft Sky and this print from the Affectionately Yours designer paper collection.  It really doesn’t look like it has to be a “boy card” or a “girl card”. The greeting here is from the retired “Welcome Words” set.

Thanks for checking out my challenge card!  Please visit Create with Connie and Mary to see all of the cards prepared by my talented teammates, as well as the entries.  Hope you’ll be inspired to play along.

Chris_buckeye_signature_rose_final

CASE-ing the Catalog

DSC_2333w

CASE stands for Copy and Share Everything.  I often look to our catalogs for ideas, especially when I need many cards for class at once.  This is one of the cards I chose for this week’s Card Buffet, and it is almost an exact copy of the card on page 18 of the Annual Catalog.

The tassels on twine look a little fussy, but they are actually quite easy to create.  I stamped the White mat first, and I attached it to the Pacific Point mat.  Then I stamped and cut the tassels – there is a framelit for this.  I attached each tassel to the stamped image using half of a dimensional.

I tied a bow in my Baker’s Twine and stapled it to the right side of the mats.  I took the long end of the twine and wrapped it around the neck of each tassel once, from right to left (don’t ask why, you could just as easily go left to right!)  After wrapping all 7 tassels, I tied another small bow, and I stapled it to the left side of the mats.

I added my vellum banners last, slipping them under the top of the tassels on the right.  I used two lengths of banner, and I attached them with glue dots.  Isn’t this a fun look for a birthday card?

Have a great day!  Don’t forget – if you have a big Wish List from our fabulous new Annual Catalog, there are still two days left to join as a Demonstrator and receive two free stamp sets along with $125 in product for $99, shipping included.  You can choose ANY stamp sets and product.  There is no obligation beyond the Starter Kit , and you do not have to sell.  Please contact me if you have any questions or click here to place your Starter Kit order.

Chris_buckeye_signature_rose_final

Jar of Love

DSC_2335w

My first two cards created with “Jar of Love” use fireflies.  Not only is a jar of fireflies a sign of summer, it’s a throwback to childhood for me.  We would collect those little wonders as long as they were out…just to let them go before bedtime.

I stamped the largest jar with White Craft Ink on Night of Navy cardstock.  I sponged three random spots in the jar with White Craft Ink, followed by Daffodil Delight.  Then I stamped the fireflies with Memento Tuxedo Black.  I colored in the firefly bodies with my White Gel Pen, and I let that dry.  I colored over the Gel Pen with a bright yellow Sharpie.  As a finishing touch, I added Clear Wink of Stella to the wings.

I used the Confetti Stars Border Punch along the top edge of the Night of Navy piece.  I also punched 1/8″ holes at the mouth of the jar so that I could wrap it with Linen Thread before attaching the mat to the Thick Whisper White card base.  Adding the length of 5/8″ burlap and greeting was my last step.

DSC_2332w

This card is almost an exact copy of a card by Melissa Bollinger.  My upline made Melissa’s card at an event she attended, and I just loved it!!  I CASEd it to make with my clubs this weekend.

There are so many accessories in the “Jar of Love” set – I have only used the firefly on these two cards.  The set includes 37 stamps!  There are different jar sizes and accessories, as well as fillers for the jar – like water, flowers, and fish.  There are also some really cute greetings and coordinating framelits for this set.  You can see the full stamp and framelit set below.

Chris_buckeye_signature_rose_final

Text Message in the Mail

CCMC412

What a soft and lovely color challenge we have this week!  I think it’s highly unlikely that we will get a masculine card out of this challenge, but who knows?  If you really want a challenge, make a masculine card with these colors!

I am thinking ahead to when my daughters are both away at school this fall.  Julia noticed the stash of cards Jen received (and saved) from me this year, and made a comment about how she is looking forward to getting cards from me in the mail.  I will certainly have to deliver!  Nothing beats a card in the mail…even if it delivers a text message abbreviation.

DSC_2330w

ILYSM = I Love You So Much

I used “Layered Letters Alphabet”, and I stamped a few extra letters and blocks to cut out and pop up on dimensionals. The background is stamped with images from the “Perfectly Wrapped” set, and the great texture on the Watermelon Wonder piece is created with the Festive Textured Embossing Folder.

Please visit Create with Connie and Mary to check out all of the entries in this color challenge.  My teammates have come up with some very creative inspiration – hope you’ll play along!

Chris_buckeye_signature_rose_final

Sunshine Wishes Remake

DSC_2319w

This is another version of a Sunshine Wishes card I showed a couple of weeks ago.  I designed this card for a swap.  I made it in a couple of color schemes before I decided which one to make in quantity for the swap.  I went with this version, in Sweet Sugarplum, because I loved the addition of the Mini Pompom Trim.

Here’s a shot of the previous version, using Affectionately Yours designer paper.  How different it looks with a change of colors and papers.  I am loving all of the new scribbly thinlits!

DSC_2304w

Chris_buckeye_signature_rose_final

Swirly Bird Sailboat

DSC_2331w

I love the sailboat in the “Swirly Bird” stamp set, and I am especially loving it in nautical red and blue combinations with our new In Color, Dapper Denim.  The embossing folder I used is also new.  It is called Seaside.  The  greeting is from “Thoughtful Banners”, punched with another new product – the Classic Label punch.

See the complete product list below, and don’t forget, if you have a big wish list, June is a great month to sign up as a demonstrator!  Through June, you can choose any two stamp sets FREE with your Starter Kit.  The Starter Kit already allows the choice of $125 in product for $99, and shipping is included.  Two free stamp sets add up to $104 value, depending on your stamp choices.

There is no obligation to buy anything beyond the Starter Kit, and no obligation to sell.  You will be able to purchase with at least a 20% discount while you are active.  Please don’t hesitate to contact me at stampyourworld@gmail.com if you would like to discuss this further or click here to place a Starter Kit order.

Chris_buckeye_signature_rose_final

Back to “Work”

DSC_2329w

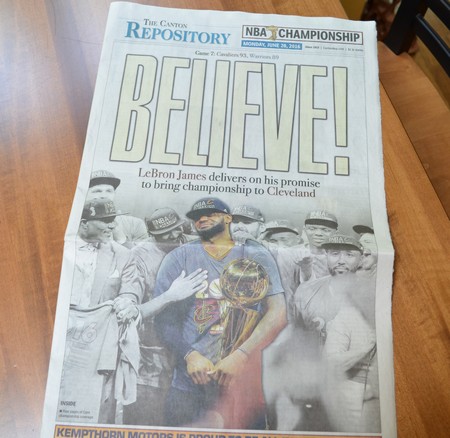
What a glorious Monday for Northeast Ohio!  Our Cleveland Cavaliers are bringing home the NBA Finals Trophy…against all odds!  Way to go Cavs!!  It was a nail-biter, but WOW!  They did it!

As for me and the reference to getting back to work…if you are a regular, you may have noticed the reduction in posts this month.  As anxious as I am to dig into all of my new catalog goodies, I have been preoccupied with my younger daughter’s graduation and party.  Thought I’d share a little about that today – there was some papercrafting involved.

DSC_2326w

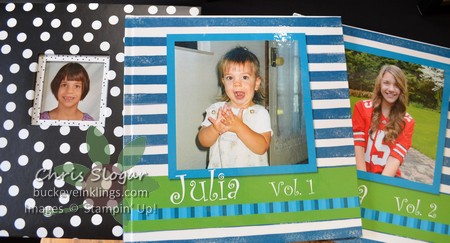
It’s no secret that I am not a scrapbooker.  I rarely even print pictures any more.  There, I said it!  Please don’t judge me – I really do love papercrafts, but my scrapbooking has always been lacking.  I created two volumes of digital pictures to cover the big events in Julia’s life.  Most printers can only print around 100 pages, so I had to break her life into two books covering about 9 years each.  In the above picture, these are the striped books.

We also had a fabulous pile of grade school class pictures, individual school pictures, sports pictures and high school dance pictures.  At the last minute, we decided to put those into an album for display.  The hardest part of this was getting the pictures into the correct order.  Then we simply attached them to bright cardstock and designer paper to create very easy spreads.  We put those into the book on the left – the black and white spotted book.

DSC_2327w

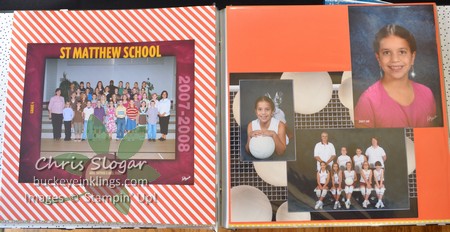
Here is a safe example to show you.  These pictures are almost 10 years old, so there are no current friends or prom dates to embarrass.  I was so thankful to have a stash of our Brights 12″x12″ cardstock and designer papers on hand.  Each spread in the book uses a pattern and a solid, and that results in a very coordinated look.  This was really simple, and it is great to have those pictures in a book instead of a box buried in the basement.

I know I am not impressing the scrapbookers out there, and I do admire all of you who can keep up with printing, organizing, and embellishing all of life’s moments!  If you are like me, though, you may appreciate these more simple solutions to memory keeping.

IMG_6080w

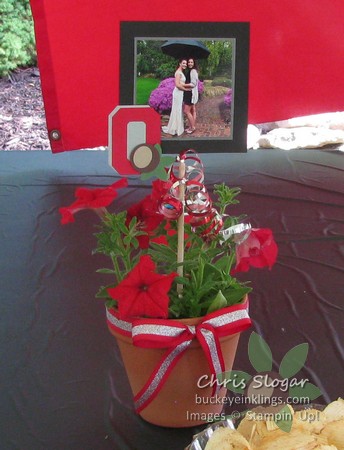
We also made some fun picks for the centerpieces at our party.  We collected 4″ square pictures and matted them on Basic Gray and Basic Black.  They are two-sided, with a different picture on the back.  The emerald shaped “Block O” is cut with a non-SU! die, but the buckeye is made with Stampin’ Up! punches (some retired).

IMG_6081w

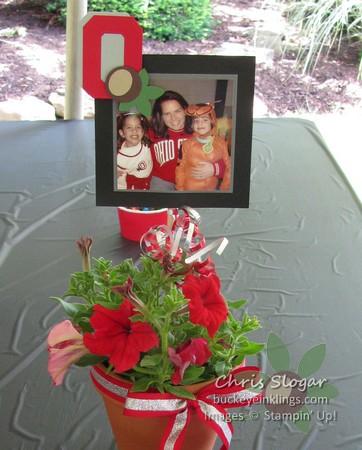
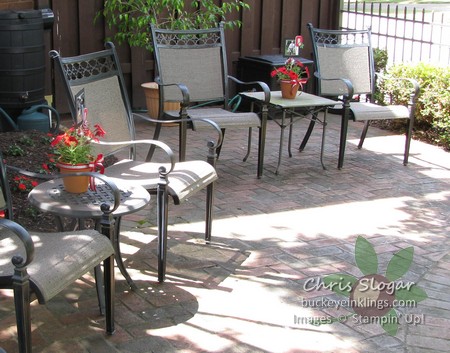
Here’s another example.  This was such an easy and inexpensive way to add color and a personal touch to our party that we made a bunch of these and scattered them all around.  Now that the party is over, I will be adding the flowers to my landscaping this week 🙂

IMG_6077w

Thanks for stopping by, and have a great Monday!

Chris_buckeye_signature_rose_final

Argyle Fun

CCMC411

This week’s sketch reminded me of an argyle pattern, so I chose the Affectionately Yours suite to create my own argyle.

DSC_2301w

I used the new Layering Squares Framelits to cut the designer paper and the scalloped Night of Navy squares.  I laid out the squares, but I didn’t attach them to the Whisper White mat.  Instead, I made a light pencil mark at the midpoint of each side.  I used those pencil marks to lay out my Washi Tape, and then I added the squares.  The greeting is from “Perfectly Wrapped”.

Please visit Create with Connie and Mary to see all of the entries in this sketch challenge.  My teammates have come up with some very creative inspiration – hope you’ll play along!

Chris_buckeye_signature_rose_final

WordPress theme: Kippis 1.15