Summer Brights

CCMC369

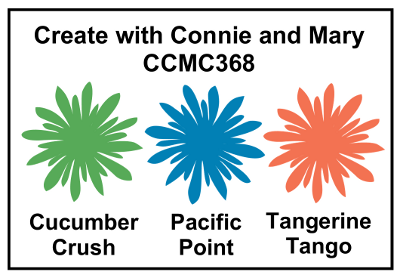
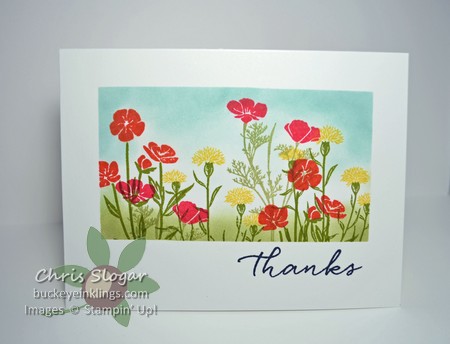
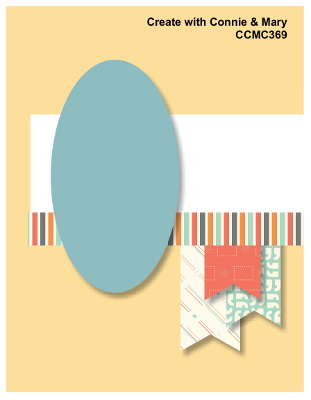
This week’s challenge at Create with Connie and Mary is a sketch.  I decided to go with a summery general greeting – and believe me, it was tough to put aside my holiday sneak peek products!  I know I will miss these brights as we head into fall, though, so I did create a bright card.  It sort of resembles the sketch.  🙂

DSC_1274w

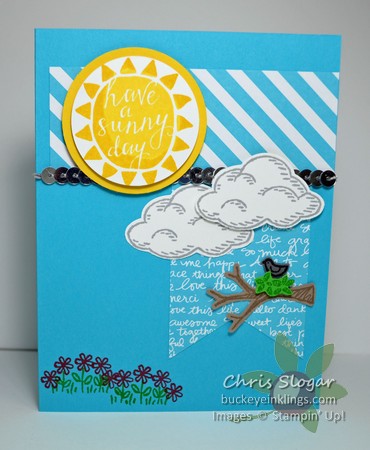
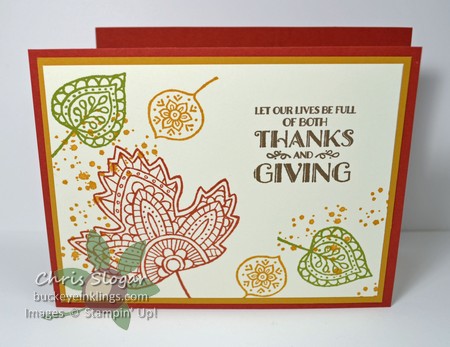
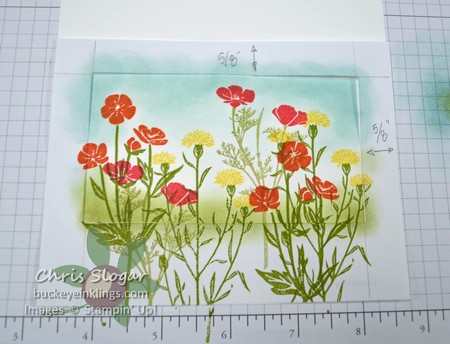
The sunshine stamp is from “Silhouettes & Script”.  I inked it in Daffodil Delight, and then I rolled the edges in Crushed Curry before stamping.  The rest of the stamps are from “Sprinkles of Life”.  The original plan was to use banners, as per the sketch, but the clouds just worked better.  Sometimes the sketches are just a starting point.

This will be a great card to send to my daughter Jen this week as she gets settled in for a new school year.  Today is actually her move-in day, and I have always called her “Sunshine”.  I am handling Jen’s departure a little better this year, but now the reality of Julia’s senior year of high school is setting in.  Tuesday was her first day of school (for the last time!!)  Next it will be college apps for her and before we know it…empty house!  I should be a real mess at this time next year!

Thank you for checking out my challenge card.  Please visit Create with Connie and Mary to see all of the cards created by our talented design team!  I saw the cards in our gallery yesterday, and there is a great mix of current product and sneak peek product.

Chris_buckeye_signature_rose_final

Z-fold Fun

DSC_1255w

I made this card for our team swap this weekend because I love the way that it pulls open.  There is an insert piece that is folded in a “Z”.

DSC_1254w

DSC_1256w

The stamps are all from the set “Lighthearted Leaves” that will be available in our Holiday Catalog starting September 1.  I got the dimensions for this card from fellow demonstrator Lavonne Schwendeman.  The Very Vanilla piece measures 3 1/4″ x 11″, scored at 4 1/2″ and 9″.

DSC_1275w

We made this version in club this past weekend.

DSC_1276w

The greeting is from “Watercolor Words” and the splatter is from “Awesomely Artistic”.  The butterflies are stamped with homemade stamps.  I cut fun foam with my butterfly framelits to create them.

DSC_1277w

I learned this technique from Nicole Tugrul (click here for Nicole’s post).  I cut two of each butterfly shape, and I glued them together with Crystal Effects.  I put a little temporary adhesive (Dotto) on my acrylic block to mount them each time I want to use them.  It wipes off quite easily after the “stamps” are removed.  I rinse the ink off the foam after stamping.

Have a great day!

Chris_buckeye_signature_rose_final

Weekly Deals

This week’s Weekly Deals are shown below.  Click here to go to the store, or contact me if you would like me to order for you.


133774G Envelope Punch Board Item # 133774

Regular Price: $20.00 US/$25.00 CAN

Discounted Price: $15.00 US/$18.75 CAN

Basic Black Baker’S Twine Item # 134576

Regular Price: $3.00 US/$3.75 CAN

Discounted Price: $2.25 US/$2.81 CAN

Bow Builder Punch Item # 137414

Regular Price: $18.00 US/$22.00 CAN

Discounted Price: $13.50 US/$16.50 CAN

Gold 5/8″ Satin Ribbon Item # 134547

Regular Price: $7.00 US/$8.75 CAN

Discounted Price: $5.25 US/$6.56 CAN

Vintage Faceted Designer Buttons Item # 127555

Regular Price: $6.00 US/$7.50 CAN

Discounted Price: $4.50 US/$5.63 CAN

Tiny Triangles Textured Impressions Embossing Folder Item # 133740

Regular Price: $7.50 US/$9.25 CAN

Discounted Price: $5.63 US/$6.94 CAN


Chris_buckeye_signature_rose_final

Team Meeting with a Halloween Sneak Peek

DSC_1252w

One of the great things about being a Demonstrator is being able to get the new season’s products early!  We went with a Halloween theme at our team meeting this month, and we made a couple of super-cute projects.  The treat box on the left was brought to us by our teammate Theresa Custer.

DSC_1253w

There are so many new products to see here, starting with the Square Pillow Box, which is cut from a thinlit.  The thinlit set contains 7 other dies, including a window/tag for the box and cute seasonal shapes.  This box is made from Wild Wasabi cardstock, and though it is hard to see in the picture, it is embossed with the Large Polka Dot folder.  The box is roomy – this one holds a Reese’s peanut butter cup and a Kit Kat.  These boxes will also be a great way to present gift cards.

The black spider web is from a pack of doilies that are pre-cut, and the Black Glimmer Paper and Rick Razzleberry ribbon are new, too.  There is just a little strip of the new Happy Haunting designer paper pattern showing on the tag, and BOO is cut from the Boo to You framelits.  These framelits coordinate with the “Howl-o-ween Treat” stamp set that includes the spider.

We also used the best new product in the catalog.  You cannot see it, and that is what makes it the best!  Imagine a strong, but very fine line of glue that comes out in a steady stream from a tip that does not clog.  It is perfect for sequins and skinny cardstock cut-outs.  I know this sounds like wishful thinking, but it is a real product, the Fine-Tip Glue Pen.  It will be available September 1.

DSC_1252w

On the right, we have 3″ x 5″ notepads like I have shown before (here).  I modified them to show off the new Happy Haunting Washi Tape.  The stamp is from “Among the Branches”.

The new Holiday Catalog products will be available September 1.  If you are anxious to get your hands on them early, why not join Stampin’ Up! as a Demonstrator?  You can order holiday products in your Starter Kit and pay just $99 + tax for $125 of your choice of products (shipping is FREE).  And if your list is long, you can continue to shop for yourself with a discount – there is no obligation to sell.  In fact, there is no obligation beyond the Starter Kit.  Please contact me if you have any questions, or click here to order a Starter Kit.  I would love to have you on my team!

Thanks so much to Theresa for today’s great Pillow Box project, and thanks to you for stopping by!

Chris_buckeye_signature_rose_final

Holly Jolly Greetings

DSC_1251w

This is a sneak peek at “Holly Jolly Greetings” which will be available starting September 1 in this year’s Holiday Catalog.  “Christmas Greetings” are the coordinating thinlits, and this will be a great bundle for tags and packaging as well as cards.

I wanted to showcase this bundle, so I used it with no other sets on this card.  That was a challenge because most of the stamp set is words and the thinlits are words.  There is a great big snowflake, though, and these adorable dangling stars.  I found a simple sketch at Just Add Ink that gave me my layout.

JAI #275

You can see all the entries in this sketch challenge at Just Add Ink.  Thanks for looking!

Chris_buckeye_signature_rose_final

Birthday Colors

CCMC368

I thought that this week’s challenge colors called for a birthday card, and I just love a bright balloon…

DSC_1248w

I used “Celebrate Today” for the balloon and the greeting, and I used 5 layers of cotton paper for the star on the left.  I did sneak one item in from the upcoming Holiday Catalog – the Silver Cord.  That’s a great new trim!  It will be available September 1.

Take a peek at the Challenge Team cards at Create with Connie and Mary.  These ladies always come up with fabulous cards!  Hope you’ll be inspired to play along!

Chris_buckeye_signature_rose_final

All Ye Faithful Sneak Peek

DSC_1249w

I received my Holiday Catalog preorder the other night, and of course, couldn’t wait to dig in!  As a result, I have a sneak peek today of products that will be available starting September 1.

This card is made with the set “All Ye Faithful”, a lovely nativity set that also includes images of the three wise men and a shepherd.  I focused on the Holy Family today, and I used the Hearth and Home thinlits to create a stable to frame them.  Those thinlits are versatile enough considering their intended uses to create windows and fireplaces, but I think we will see them in countless more applications.

DSC_1250w

If you are anxious to get your hands on these holiday products early, why not join Stampin’ Up! as a demonstrator?  You can order holiday products in your Starter Kit and pay just $99 + tax for $125 of your choice of products (shipping is FREE).  And if your list is long, you can continue to shop for yourself with a discount – there is no obligation to sell.  In fact, there is no obligation beyond the Starter Kit.  Please contact me if you have any questions, or click here to order a Starter Kit.  I would love to have you on my team!

Thanks for looking!

Chris_buckeye_signature_rose_final

Weekly Deals

This week’s Weekly Deals are shown below.  Click here to go to the store, or contact me if you would like me to order for you.

133324G Scalloped Tag Topper Punch Item # 133324Regular Price: $23.00 US/$28.00 CAN

Discounted Price: $17.25 US/$21.00 CAN

Wild Wasabi 1/2″ Seam Binding Ribbon Item # 134570Regular Price: $7.00 US/$8.75 CAN

Discounted Price: $5.25 US/$6.56 CAN

Clothespins Item # 133764Regular Price: $4.00 US/$5.00 CAN

Discounted Price: $3.00 US/$3.75 CAN

2014-2016 In Color Designer Washi Tape Item # 138382Regular Price: $8.00 US/$10.00 CAN

Discounted Price: $6.00 US/$7.50 CAN

File Tabs Edgelits Dies Item # 133729Regular Price: $11.00 US/$13.50 CAN

Discounted Price: $8.25 US/$10.13 CAN

Classy Designer Buttons Item # 138393Regular Price: $6.00 US/$7.50 CAN

Discounted Price: $4.50 US/$5.63 CAN


Chris_buckeye_signature_rose_final

“Wild About Flowers” in Only One Layer

DSC_1247w

This is truly a one-layer card.  It is one piece of cardstock folded in half with no additional pieces.  This is a real rarity for me!

Since the addition of Thick (100 lb) Whisper White to our Annual Catalog in June, I am using more white card bases than ever.  Thick Whisper White is not just sturdy, it is wonderfully smooth for stamping.  This card takes advantage of both qualities.

DSC_1245w

This is our typical 4 1/4″ x 5 1/2″ card.  I made a mask that fit the front of the card before stamping.  I drew lines on three sides of the mask, 5/8″ from the edges.  I used the 2 3/8″ square framelit to cut the rectangle in two passes.  I placed it in one of the corners defined by the lines, and then the other.

DSC_1246w

I tacked the mask down with temporary adhesive, and stamped the stems and flowers from “Wild About Flowers”.  I used sponge daubers to add Soft Sky and Pear Pizzazz.  The final step was to add a greeting.  I used one from “Watercolor Wishes”.

Thanks for looking, and have a great Monday!

Built for Free Using: My Stampin Blog

Chris_buckeye_signature_rose_final

Got Washi Tape?

Of course you do!  It’s irresistible!  We all have it stashed away, and if you are like me, you forget to use it.  I stumbled upon a Washi Tape notepad by Amy Storrie that I really like, and I have CASEd it here.

DSC_1238w

This started as a plain 3″x5″ notepad.  I cut a 3″x5″ piece of Thick Whisper White to use as a cover, and I decorated it with Cherry on Top Washi Tape.  I embossed it, which looks cool, but also helps to keep the Washi Tape tight to the cardstock.  The stamped image is from “Oh My Goodies”.

DSC_1240w

Here’s a look at the binding from the underside.  I cut a piece of Bermuda Bay cardstock 3″x2″.  I scored at 3/4″ and 1 1/8″ on the 2″ side, and used sticky strip to attach the pieces to the notepad.

DSC_1241w

I made these note pads with a random selection of retired tapes – one from a garden collection, one from a Christmas collection, and one from an autumn collection.  It’s my own collection – I’ll call it “Sweet Summer”.  I’ve always wanted to help come up with the names!

If you are interested in more Washi Tape projects, check out this post at {crazy}beYOUtiful.  Amy Kunkle did a compilation of her favorite ideas for Washi Tape cards this week.

Have a great weekend!

Chris_buckeye_signature_rose_final
WordPress theme: Kippis 1.15