Where to Begin?! – Sneak Peek

I was on vacation last week, and you know how it is…it’s such a bummer when vacation ends.  This time, however, I had a little something to look forward to…I knew that my Holiday Catalog preorder was waiting for me at home 🙂

So where to begin?!  Fall?  Halloween?  Christmas?  I decided to start with my top “must-have” bundle from the Holiday Catalog.

DSC_2437w

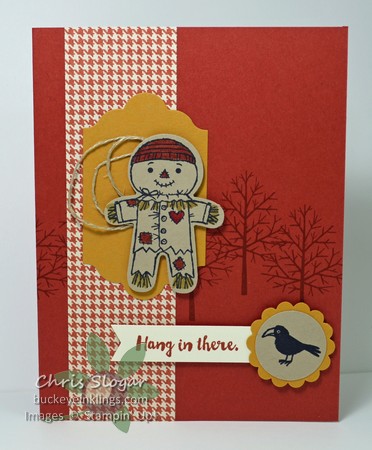
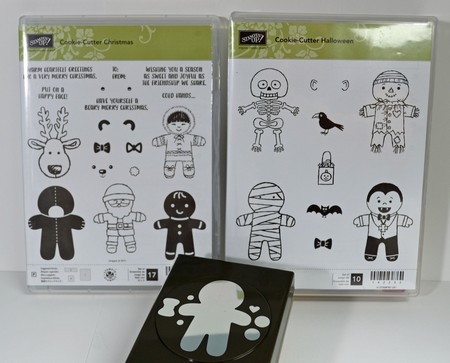
The bundle I knew I would not pass up is “Cookie Cutter Christmas”.  As the name suggests, it is all about Christmas, and it coordinates with the cool Cookie Cutter Builder Punch.  But it also coordinates with a wonderful fall set called “Cookie Cutter Halloween”, and that is where I got my scarecrow.

DSC_2438w

Aren’t they yummy?

There are some other sneak peeks here, too – the houndstooth designer series paper and the tree stamped in the background from “Totally Trees”.  There is a lot to look forward to in the Holiday Catalog!!  Please contact me if you would like a copy.  Items will be available for purchase starting September 1.  If you can’t wait, you can get them as part of your Starter Kit right now when you join Stampin’ Up! as a Demonstrator.  Please contact me if you would like more details.

Have a great day!

Chris_buckeye_signature_rose_final

The Specialty Sheets…Use Them!

DSC_2434w

I know it can be tough to cut into those specialty sheets, but there are benefits to using them.  First of all, they are gorgeous!  That means that you don’t need much else to finish your card.  Beyond that, if you use them, you can feel justified in buying more…or buying the next great paper that comes along!

My thank you notes are made on our precut and scored note cards.  I cut a 3 1/2″ x 5″ piece of an embossed sheet of Affectionately Yours paper to completely cover each card front.  I used copper embossing powder for the greeting from “Thankful Thoughts”, and I embossed it on vellum.  I tacked it down with a pretty coordinating strip of designer paper and part of a doily.  Easy!!

DSC_2435w

Have a great weekend!

Chris_buckeye_signature_rose_final

You’re a Peach!

CCMC419

I chose Fruit Stand designer series paper to scatter on my card.  I followed the proportions of the pieces in the sketch closely, but they are enlarged because I wanted to show as much of the beautiful summery papers as possible.

DSC_2420w

The peach is cut from one of the designer paper sheets, and I created my own greeting with “Labeler Alphabet”.  I make my greetings in steps, starting by laying out every other letter for the greeting on my grid paper.  I lay them out with the flat side up, leaving space for the alternating letters.  Once they are laid out, I pick up the stamps all at once with an acrylic block – in this case, the block on the left in the picture below.

DSC_2423w

I stamp the image from this first block onto the grid paper and then lay the remaining letters into place.

DSC_2424w

I pick up the letters in the second group all at once on the second acrylic block.

DSC_2425w

With the two blocks set up this way, you can easily stamp the same greeting repeatedly if you wish.

 Thank you for checking out my card for this week’s challenge.  Please visit Create with Connie and Mary to see all of the cards created by my talented teammates as well as the entries.  Hope you’ll be inspired to play along!

Chris_buckeye_signature_rose_final

Tears Raining Down

DSC_2416w

I pulled from a few sets to put together this heartfelt sympathy card for a friend who lost a very special pet.  The image of the dog with the balloon is from “Bella and Friends” and the clouds are from “Sprinkles of Life”.  The designer paper is from the Foxy Suite.

The majority of elements on this card could be reproduced with current products, but I used some retired products here, too.  I used the retired color Coastal Cabana, and I colored with our retired Blendabilities.  The greeting is from the retired set “Hot Diggity Dog”.

Chris_buckeye_signature_rose_final

Serene Scenery

DSC_2433w

These cards use one layer of Serene Scenery designer series paper and only one or two stamps.  They may be the simplest cards I have ever made.  I cut the designer papers to 4 1/4″ x 5 1/2″ and stamped each one with a greeting.  I then attached each piece to a 4 1/4″ x 11″ (scored at 5 1/2″) Thick Whisper White card base and tied a length of Linen Thread around the width.  So easy!

I recommend Archival Black ink for great coverage on our printed papers.  Here’s a better look at my four cards.

Processed with MOLDIV

Processed with MOLDIV

Chris_buckeye_signature_rose_final

A Little Love from Home

DSC_2428w

I don’t actually miss my girls yet (seeing as they haven’t left yet) but I am expecting to miss them soon 🙂  Might as well be ready!  I have been enjoying the “Labeler Alphabet” set to make my own messages, and it pairs well here with the Large Letter Framelits.

I cut the letters in the Night of Navy mat, and I added a piece of Affectionately Yours designer paper behind the openinings.  Then I simply added my message with a swirl of Night of Navy twine.

Have a great Monday!

Chris_buckeye_signature_rose_final

A Clean and Simple Sketch

This sketch really appealed to me, and I saw the vertical elements as stems.  What a great excuse to pull out “Jar of Love”!

DSC_2436w

I stamped everything but the flower directly onto the Whisper White mat.  I did some masking at the top of the jar to make it look as if the greenery stays propped on the outside.  I also punched two holes on either side of the rim for my linen thread.  I covered the back of the holes with Whisper White so that the Flirty Flaming mat would not show through.

You can see all of the entries into this challenge at Freshly Made Sketches.  Thanks for checking out my entry!

Chris_buckeye_signature_rose_final

Flowery Colors

CCMC418

I saw this color challenge as a call for a flowery card, but I couldn’t decide between “Jar of Love” and “Floral Phrases”.  In the end, I used both.

DSC_2418w

To create my background, I made a stencil.  I used the larger of the Detailed Floral Thinlits to cut a piece of vellum, and I sponged over a portion of the openings with Sweet Sugarplum.

I stamped a strip of Rich Razzleberry with the border from “Floral Phrases”, and I created the spray of greens with “Jar of Love”.  I added one simple flower and a greeting, created with “Labeler Alphabet”.

Thank you for checking out my challenge card.  Please visit Create with Connie and Mary to see the cards my talented teammates have created in these colors.  Hope you’ll be inspired to play along!

Chris_buckeye_signature_rose_final

Easy Favors

DSC_2422w

This year’s Annual Catalog includes these new 3″ x 6″ Gusseted Cello Bags.  You can make a quick favor by slipping in a folded piece of designer paper and filling with a treat.  I used a 2 3/4″ x 7 1/4″ piece from the Festive Birthday collection, scored at 3/4″, 4 1/2″, and 6 1/4″.

The tag is made from another of the patterns in the collection, cut with a Lots of Labels framelit and stamped with a greeting from “Thankful Thoughts”.  A gold clip and a thick twine bow finish it off.

Chris_buckeye_signature_rose_final
WordPress theme: Kippis 1.15