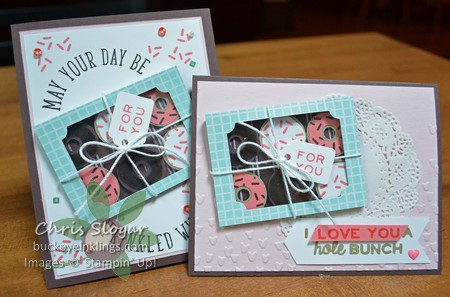
I borrowed the stamps and theme from my May 2017 Paper Pumpkin kit to make these cards. The kit is called Sprinkled with Love, and the theme is donuts 🙂
Here’s a look at what the kit is desinged to make…
And good news for those of you who have never tried Paper Pumpkin – if you subscribe by June 10, your first three months are 25% off. It ‘s the perfect time to start receiving these pre-designed, cut, and coordinated projects in the mail. You’ll pay only $14.96 + tax per month, shipping is included.
Paper Pumpkin delivers a fully-designed kit with stamps, ink, and embellishments each month. The regular price is $19.95 per month, and your subscription will be billed at that price starting in month four. However, there is no subscription commitment – you can cancel at any time. Click here to start your subscription. Please use the Promo Code STARTHERE to get the 25% discount on your first three months. Drop me an email at stampyourworld@gmail.com to let me know you have joined with this promotion, and I will send you one of my Featured Cards – the Jar of Love Pocket Card.
If you haven’t joined Paper Pumpkin because you think you might not always like what the kit makes, fear not! There is a wonderful facebook group for Paper Pumpkin subscribers showing alternate ideas for the kits, and Pinterest is loaded with ideas, too.
If you are new to stamping, Paper Pumpkin gives you everything you need for complete projects. If you are an experienced crafter, you will appreciate having a pre-planned project with exclusive stamps and materials. You can’t go wrong! But then again, if you don’t like it, you can cancel at any time.
Back to my donut cards…
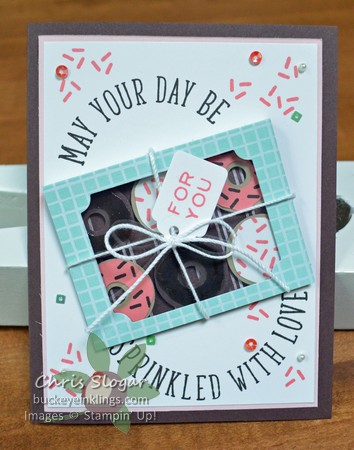
I used stamps from the kit along with the sprinkle stamp from “Cool Treats” for my smaller donuts, and I also used Sprinkle Embellishments from the Cool Treats Suite.
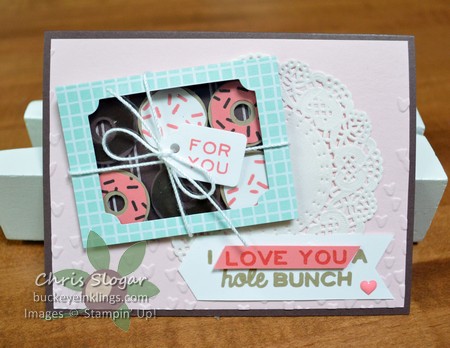
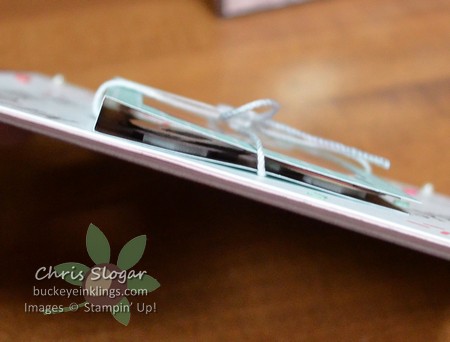
The donut boxes are not really boxes at all, they are simply 3 1/8″ x 4 3/4″ pieces of designer paper, also from the Cool Treats Suite. I scored the 4 3/4″ sides at 2 1/4″ and 2 1/2″, and I cut windows in the lids with a shape from the Tags & Labels Framelits. The tags are also cut with a framelit from that collection. I added 2″ x 3″ pieces of Window Sheet to the underside of the lids with glue dots.
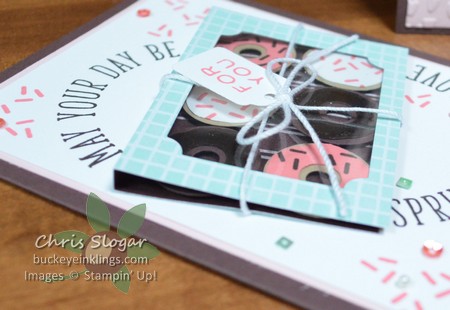
A real box would get crushed in the mail. My faux box is loosely tied with baker’s twine, and it can be flattened when putting the card into an envelope.
The donuts are mounted on dimensionals under the lid. And the donuts themselves?…
The donuts are 1″ circles. The donut and frosting layers are made the same way – punch a smaller hole first in the appropriate color, and then punch around the small circle with the 1″ circle punch.
The smaller holes in the donut layers (Crumb Cake and Chocolate Chip) were made with a 1/4″ handheld punch. The smaller holes in the frosting layers (Early Espresso and Flirty Flamingo) were made with a 3/8″ circle punch. I hand-cut the wavy edge of the frosting layers, and I added Fine-Tip Glue over the Early Espresso frosting to make it shiny. Yummy – double chocolate!!
Of course the jelly donuts are simply 1″ circles (Crumb Cake). The frosting layers are also 1″ circles, hand-cut with a wavy edge. These are really fun cards to make, and my daughter says she always likes the food-themed cards the best!
Have a great weekend!
