You wouldn’t know it with the 80 degree temperatures in Ohio this weekend, but it is fall!
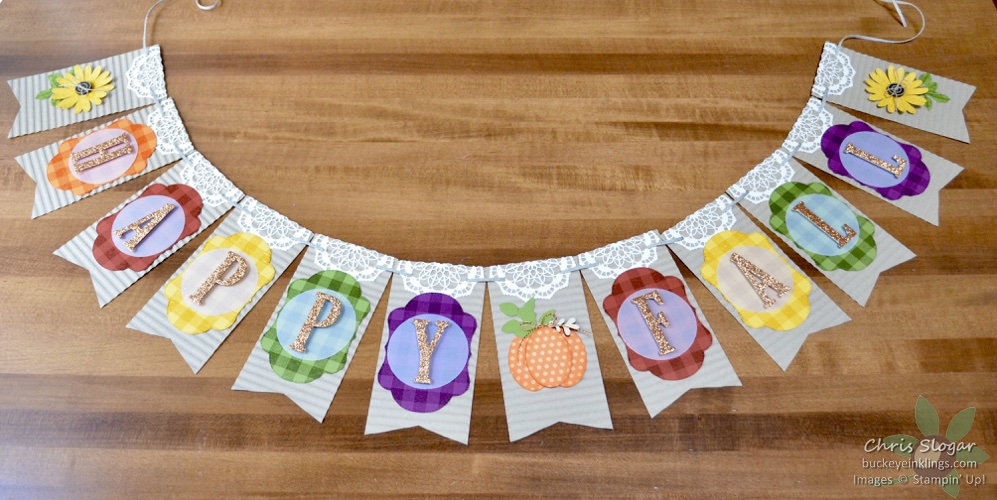
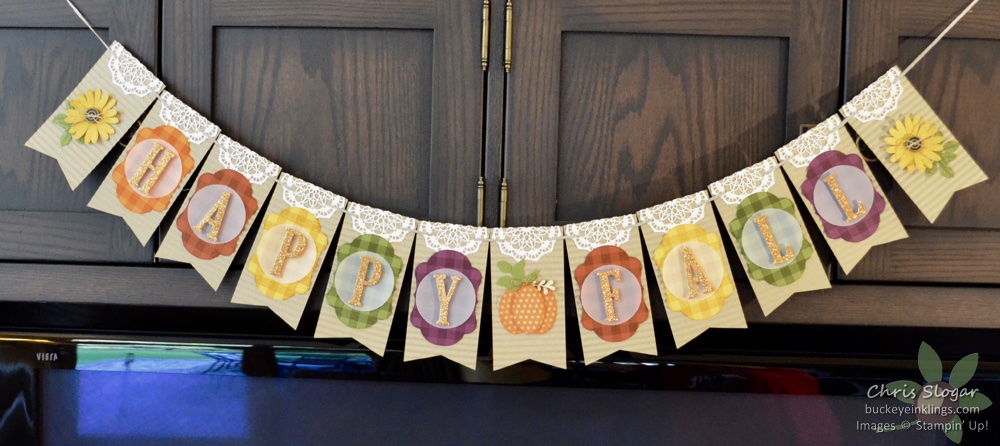
I haven’t made many banners, but last time I was with my girls, we noticed some cute fall banners at Target. I told the girls to give me a couple of days, and I would be happy to make them banners for their apartments. This is what I came up with.
Each piece started as a 3″ x 6″ piece of Crumb Cake card stock. I cut the pennant ends with scissors and embossed them with the Corrugated embossing folder. Dawn Thomas’ beautiful banner (click here) inspired me to use the Buffalo Check background. I cut my Buffalo Check pieces with one of the recently retired Stitched Seasons framelits.
There are a few other retired products thrown in here (the wood buttons and leaf). This is a great project for odds & ends! They were so fun that I see some Christmas banners in my near future.
If you need any of our fabulous products, I would very much appreciate your business in my online store! Please click here to shop, or use the carousel below to be directed to a product used in today’s project.
Place an order over $35 with this month’s Hostess Code and you will receive a package of Red Rhinestones and a handmade card from me as a thank you! Orders over $50 are also eligible for a Buckeye Point in my Loyalty Rewards Program.
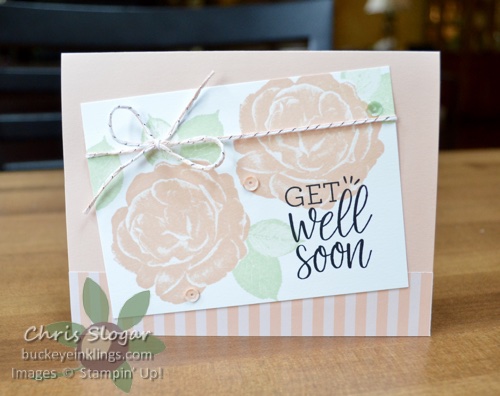
“Healing Hugs” is a great set for quick cards like this one. The stamps produce the beautiful images with no effort! I used Petal Pink and Soft Sea Foam for this very soft look. The designer paper strip is 1″ x 5 1/2″ and the Whisper White measures 3 1/4″ x 4 1/2″.
If you need any of our fabulous products, I would very much appreciate your business in my online store! Please click here to shop, or use the carousel below to be directed to a product used in today’s project.
Place an order over $35 with this month’s Hostess Code and you will receive a package of Red Rhinestones and a handmade card from me as a thank you! Orders over $50 are also eligible for a Buckeye Point in my Loyalty Rewards Program.
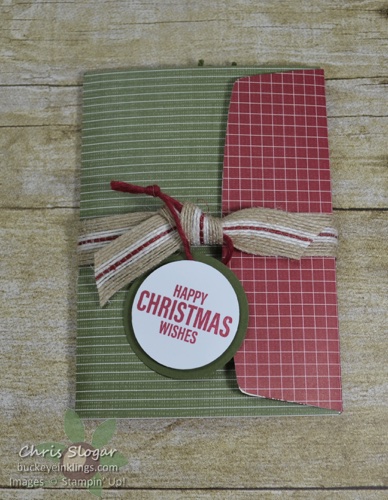
Today I want to share pictures and dimensions from last night’s Facebook Live project – a mini album made from three note card envelopes. It opens up to reveal pockets and spaces for pictures and notes. You could even tuck in some cash or a gift card.
My favorite suggestion of what to include came from my friend Brenda. I love her idea to include a special recipe, perhaps with a picture of the giver or a picture from the past – maybe even a picture of the giver and recipient baking together.
Once you know how to put together the base, you can get creative with your pockets and decorations. As promised, I want to link you to the project I CASEd. I followed Liz Yuille’s version pretty closely, except that I used smaller envelopes and a holiday theme. I am sure you will enjoy her versions, too – and they will show you how versatile this project is. Click here for Liz’s project at Old Stables Crafts.
The video from last night is included below, but I also want to give you pictures and dimensions here.
Designer paper cover pieces 5 3/16″ x 6″ and 5 3/16″ x 3 5/8″
Designer paper for inner flap 2″ x 5 3/16″
There are four inner “pages”, each requires a cover piece of designer paper. (In this view of “pages” 1 and 2, I am referring to the script and red plaid piece.)
(4) designer paper pieces 3 1/2″ x 5″
Additional pieces needed for each page are listed below.
Page 1
Designer paper for pocket 3 1/2″ x 2″
Mossy Meadow cardstock for trim 3 1/2″ x 1/2″
Mossy Meadow for tag 2 1/2″ x 3 3/4″
Whisper White for tag 2 3/8″ x 3 5/8″
Page 2
Cherry Cobbler for insert 3 3/8″ x 4 7/8″
Whisper White for insert 3 1/4″ x 4 3/4″
Page 3
Whisper White 3 1/2″ x 7″, scored at 5″
(2) Additional designer paper pieces 3 1/2″ x 2″
Page 4
Mossy Meadow insert 3 3/8″ x 4 7/8″
If you make your mini albums with the note card envelopes, you are going to have a lot of note cards left over! I recommend using them on a card like this “joy fold” card. You can decorate it as you like. I colored a farmhouse with my Stampin’ Blends.
A note card is nested with a Gray Granite card base here. The note card fold is on the right, and it opens as shown bleow.
The Gray Granite base measures 5 1/2″ x 6 1/2″, scored at 4 1/4″. The resulting card is 4 1/4″ x 5 1/2″, which fits in our standard medium envelope.
The note card provides an inner panel for a greeting and personal message.
The designer paper pieces on this sample measure 2″ x 5 1/4″ and 3 1/4″ x 4 3/4″. If you would like to have a more efficient use of 6″ or 12″ designer paper, I recommend cutting off a 1/4″ strip from the front panel of the white note card. If you trim it down in this way, you will only need a 3″ width of designer paper.
Thanks so much for checking out my project! The video and product list follow. If you need any Stampin’ Up! products, I would greatly appreciate your support in the online store. Please click here to shop, or use the carousel below to be directed to a product used in today’s project.
Place an order over $35 with this month’s Hostess Code and you will receive a package of Red Rhinestones and a handmade card from me as a thank you! Orders over $50 are also eligible for a Buckeye Point in my Loyalty Rewards Program.
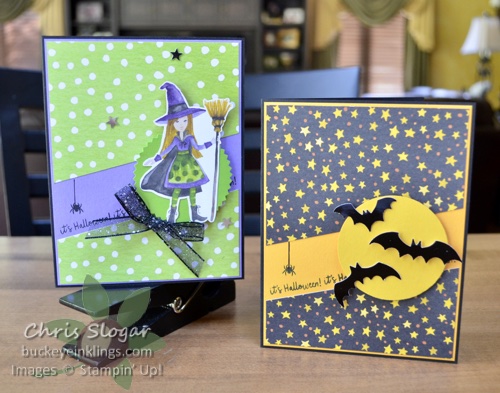
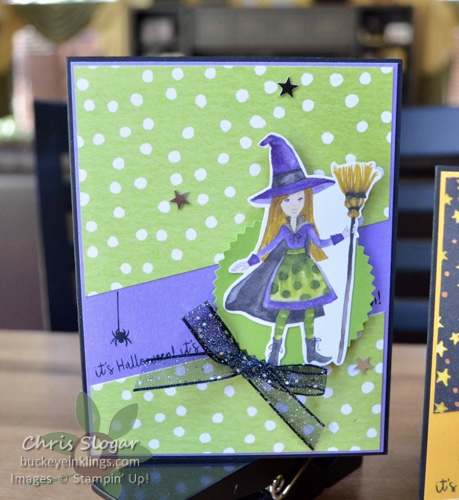
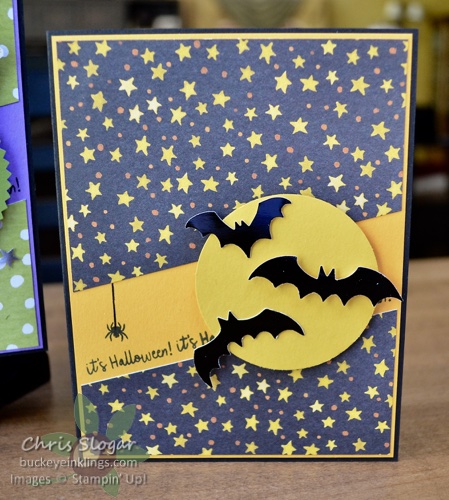
The Toil & Trouble designer paper provides a very easy backdrop for these cards. I started with a 4″ square of each pattern. I cut each square on a diagonal from a point 1″ above the bottom on the left to a point 2″ above the bottom on the right. I then mounted the two resulting pieces on a 4 1/8″ x 5 3/8″ cardstock mat.
The witch on this card is fussy-cut from the designer paper.
The bats are punched from Black Foil. The greeting and spider stamps are from the September 2018 Paper Pumpkin kit.
If you need any of our fabulous products, I would very much appreciate your business in my online store! Please click here to shop, or use the carousel below to be directed to a product used in today’s project.
Place an order over $35 with this month’s Hostess Code and you will receive a package of Red Rhinestones and a handmade card from me as a thank you! Orders over $50 are also eligible for a Buckeye Point in my Loyalty Rewards Program.
Stampin’ Up! has a week-long sale to celebrate our special holiday for creativity. We are also now offering accessories for the Stamparatus, including grid sheets to fit the platform. Check out the flyers for each of these promotions that are included in this post.
In honor of World Card Making Day, I have a very simple card. I think it is a great card for a beginner, or for anyone who is time-challenged. It uses the hostess set “Warm Hearted” and the Country Lane designer series paper. It also uses the Sprig Punch – a new favorite of mine because it fits in with so many themes!
If you need any of our fabulous products, I would very much appreciate your business in my online store! Please click here to shop, or use the carousel below to be directed to a product used in today’s project.
Place an order over $35 with this month’s Hostess Code and you will receive a package of Red Rhinestones from me as a thank you! Orders over $50 are also eligible for a Buckeye Point in my Loyalty Rewards Program.
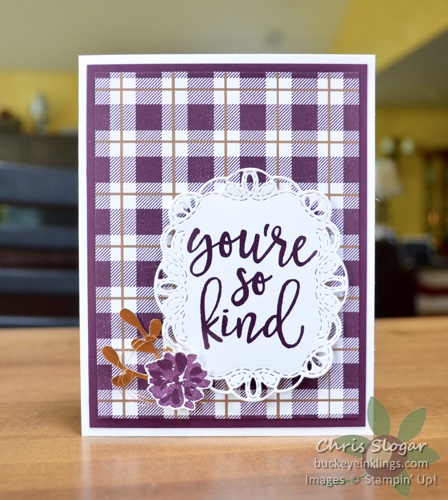
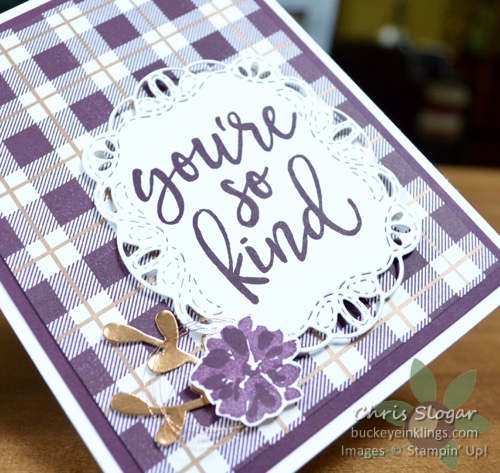
You can make a simple plaid with “Buffalo Check”. I made a Blackberry Bliss on Whisper White background and then used a Metallic Sharpie and a ruler to draw in the horizontal and vertical lines. What a great way to get more from this pretty background stamp!
The greeting is from my favorite kit in the Annual Catalog, Notes of Kindness.
The kit itself makes five of each of the designs shown. It’s great for a beginner, because it includes everything except adhesive for $35. An experienced stamper will also appreciate a beautiful pre-planned project that includes pretty stamps to use on future projects. Keep this kit in mind for your gift-giving needs, too. It comes in a lovely giftable box.
Have a great weekend!
If you need any of our fabulous products, I would very much appreciate your business in my online store! Please click here to shop, or use the carousel below to be directed to a product used in today’s project.
Place an order over $35 with this month’s Hostess Code and you will receive a package of All is Bright Paper Clips from me as a thank you! Orders over $50 are also eligible for a Buckeye Point in my Loyalty Rewards Program.
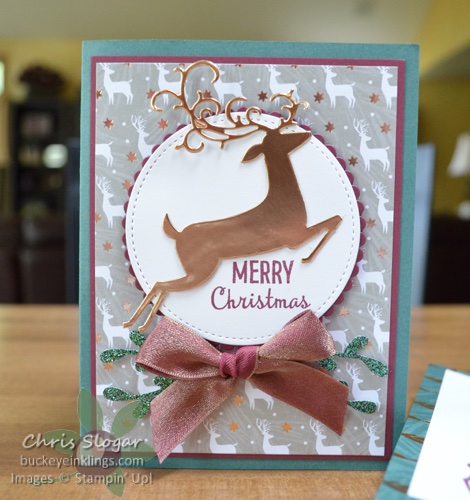
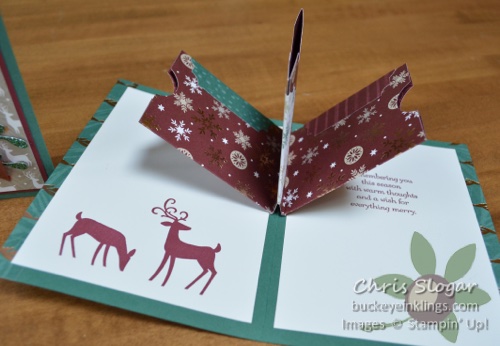
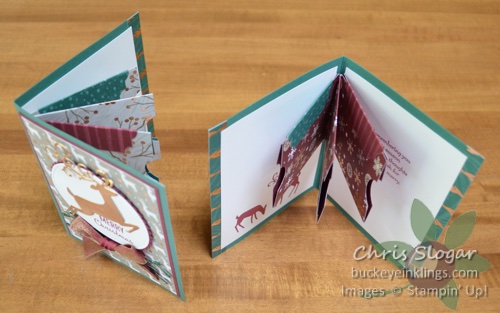
These are my facebook live projects from last night – very merry and bright, aren’t they? Each is a meandering pocket card. I learned this card type from Krista Thomas of RegalStamping.com. Krista presented several versions of this card type on our Stampin’ Up! cruise – click here to see her cards.
The meandering part is the inner triple pocket on each of these. These pockets can be used for gift cards, notes, pictures, cash, etc.
The designer paper in these two projects is from the Dashing Along collection, available to Hostesses or Customers with an order of $250 or more this month. Let me know if I can create a group order for you and your friends so that you can receive this paper in a combined order! Individual orders can be shipped to different addresses.
The greetings are from the Merry Christmas to All Bundle.
The triple pocket insert is made from a single piece of 6″ x 10″ designer paper, scored at 3″ on the 6″ side and at quarter points (2 1/2″, 5″, and 7 1/2″) on the 10″ side. The resulting pockets measure 2 1/2″ x 3″. See the video below to see how to create the cuts and folds fo this meandering pocket.
I have also used two 1/2″ designer paper strips and two 3 3/4″ x 5″ Whisper White insert pieces on the inside of this card.
I enclosed a meandering pocket piece on the inside of this Cherry Cobbler wrap piece. Instead of securing the triple pocket inside of a flat fold, the Cherry Cobbler piece has a 3/8″ spine to allow more room for goodies in the insert piece.
The Cherry Cobbler piece measures 3 1/4″ x 9 1/2″, scored at 3 5/8″, 4″, 7 5/8″ and 8″. The designer paper pieces measure 1 3/8″ x 3 1/8″ and 3 1/2″ x 3 1/8″. The tag is from the Christmas Traditions Punch Box.
The pocket pieces are 3″ square on this version, allowing enough room for a tea bag, Ghirardelli chocolate and a gift card. The designer paper for the pockets starts as a 6″ x 12″ piece, scored at 3″ on the 6″ side, and at quarter points (3″, 6″, and 9″) on the 12″ side.
I made this version with the Joyous Noel designer paper collection and the Dashing Deer Bundle.
These are really fun, and slightly addictive!
Check out the video below for more detailed instructions.
If you need any of our fabulous products, I would very much appreciate your business in my online store! Please click here to shop, or use the carousel below to be directed to a product used in today’s project.
Place an order over $35 with this month’s Hostess Code and you will receive a package of All is Bright Paper Clips from me as a thank you! Orders over $50 are also eligible for a Buckeye Point in my Loyalty Rewards Program.
Welcome to the final Alaska Achievers Blog Hop! You may just be starting the blog hop here at my blog (Chris Slogar) or may have come from the person previous to me in the list. If you get off track at any time, the full lineup below will help you move along from blog to blog so you see all of the projects.
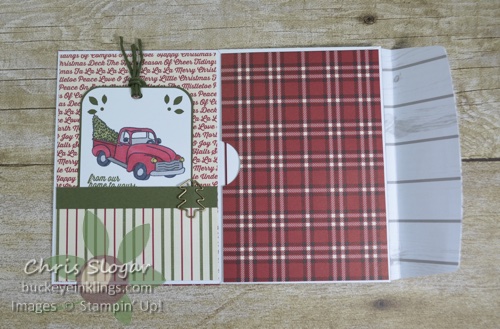
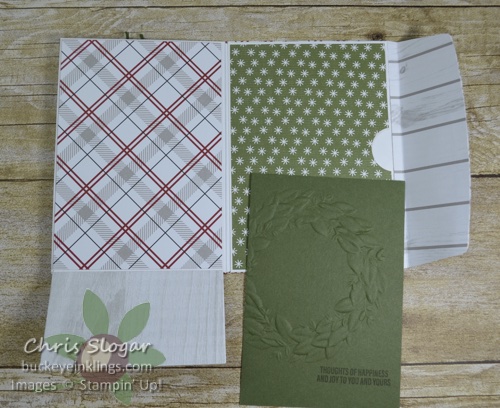
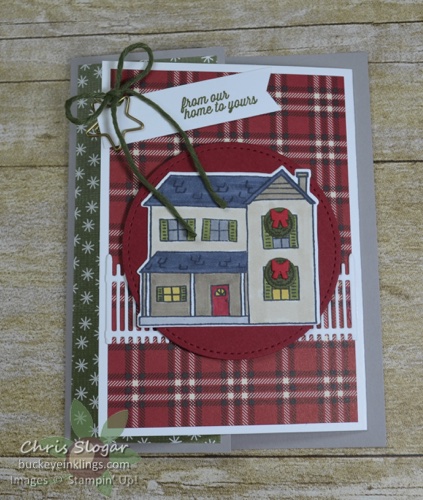
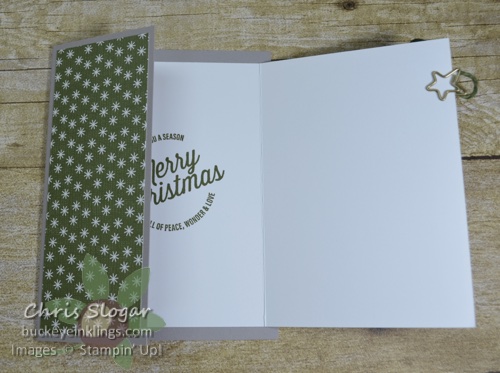
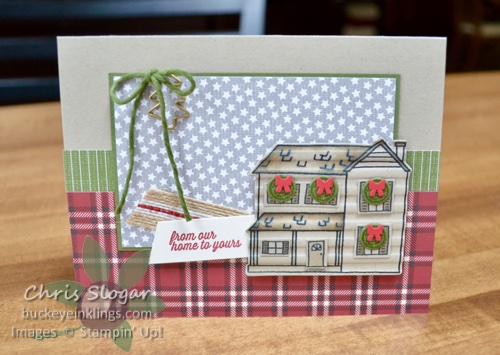
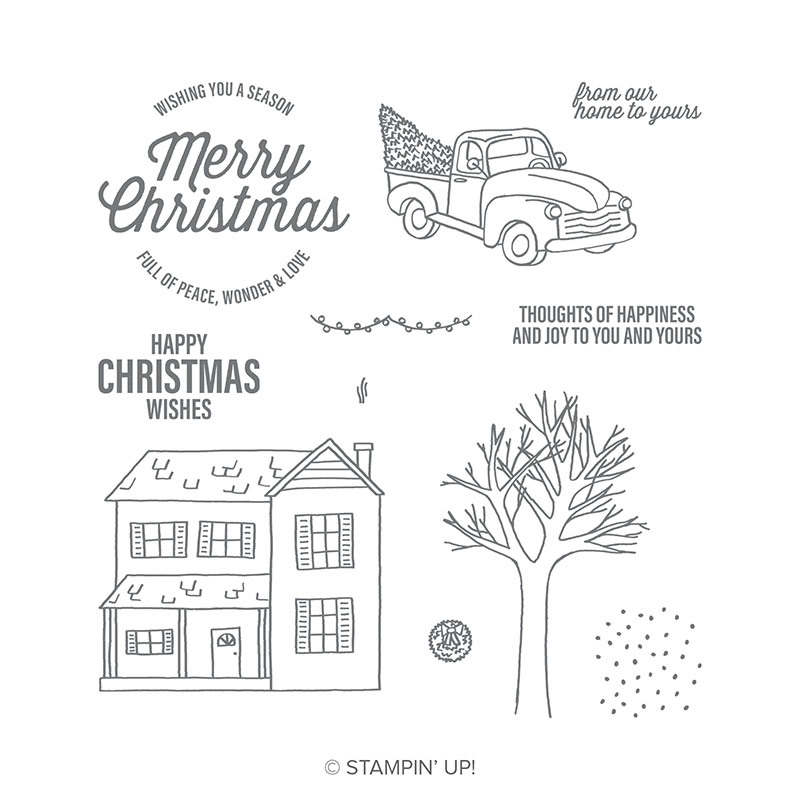
This month we are highlighting projects from our 2018 Holiday Catalog. There are so many goodies to choose from in this catalog! I made a Christmas card with my favorite new suite, Festive Farmhouse. The products from this suite were at the top of my list – probably because they bring back memories of my grandparents’ big farmhouse.
The coordinating papers and trims are a perfect complement to the cozy farmhouse image. I have only used a few of the stamps on this card. The full set offers so much more.
The house is CASEd from a project Shelli presented on our cruise. I stamped the farmhouse in Memento Black on Crumb Cake and added some shading with my Crumb Cake Blends. I cut the house out with a framelit and embossed it with the Corrugated TIEF. I added fussy-cut windows and a door over the corrugated house. Love how the texture looks like siding around the windows!
Need a Holiday Catalog? If you live in the US, and you don’t already have a Demonstrator, please email me at stampyourworld@gmail.com. I would be happy to send you one!
Thanks so much for taking part in our blog hop today! Remember that currently you are at my blog – Chris Slogar – so check the blog hop line up list to see who is next, and enjoy!
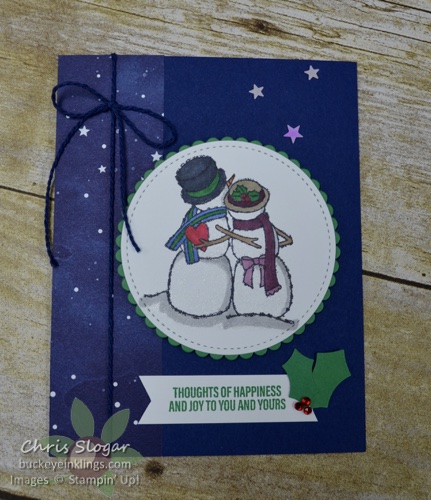
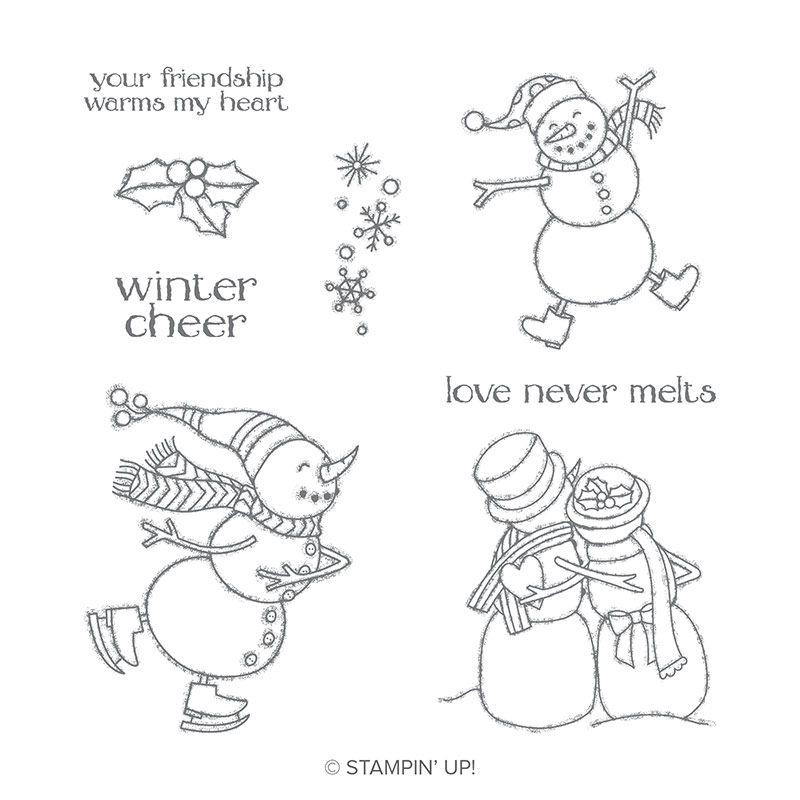
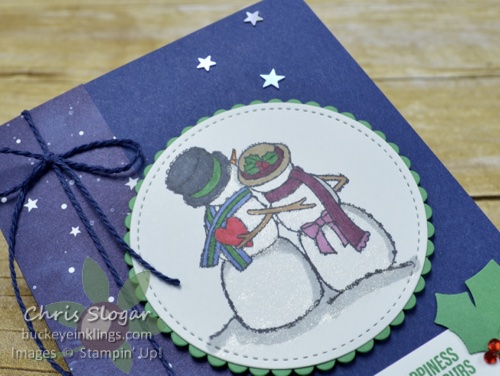
“Spirited Snowmen” is a great set for coloring, and it doesn’t take a lot of effort to fill in a few bright details to complete the images. The stamp set includes three fun snowman images as well as greetings and some accessories. It’s a set for the holidays and beyond.
I hope you can see the shimmering snow here. I used Wink of Stella over the snowmen and groundline to add sparkle, and the star sequins are iridescent. The starry designer paper is from the Twinkle Twinkle collection and the greeting is from Farmhouse Christmas.
If you need any of our fabulous products, I would very much appreciate your business in my online store! Please click here to shop, or use the carousel below to be directed to a product used in today’s project.
Place an order over $35 with this month’s Hostess Code and you will receive a package of All is Bright Paper Clips from me as a thank you! Orders over $50 are also eligible for a Buckeye Point in my Loyalty Rewards Program.
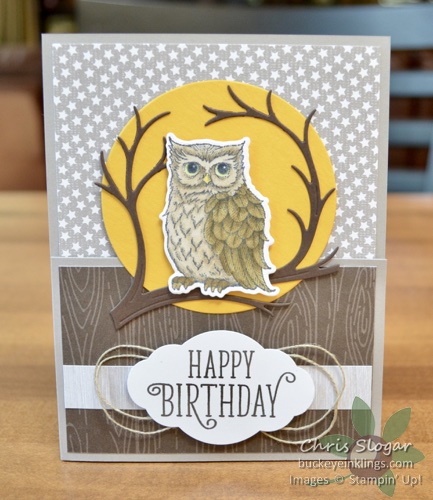
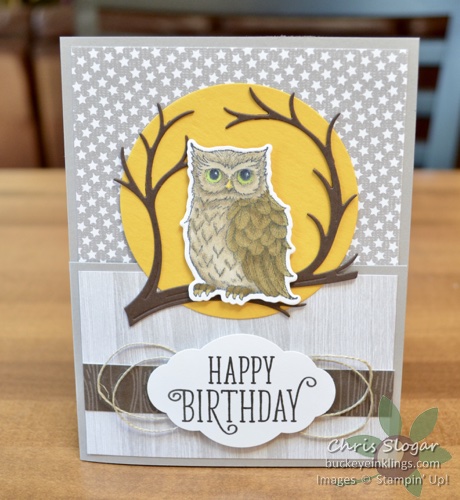
This owl from “Still Night” was a little intimidating to me. I thought it might be beyond my abilities to make an owl look realistic with shading. Give me a cartoon owl and some bright Blends colors, and I will give you a fabulous whimsical owl. But this guy…he needed to look natural.
I was pleasantly surprised at my results with just a few colors – Light and Dark Crumb Cake, Light and Dark Soft Suede, Light Granny Apple Green, Light Mango Melody, and Light Black. I can’t take too much credit for this success – the stamp itself has great markings of texture, and of course, the Stampin’ Blends make everything look professional.
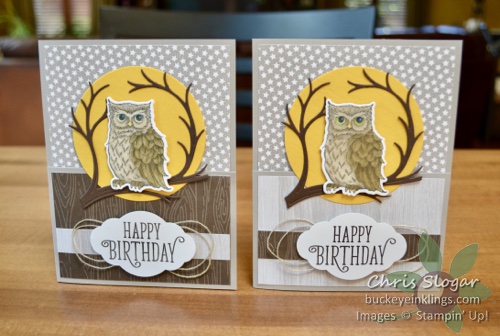
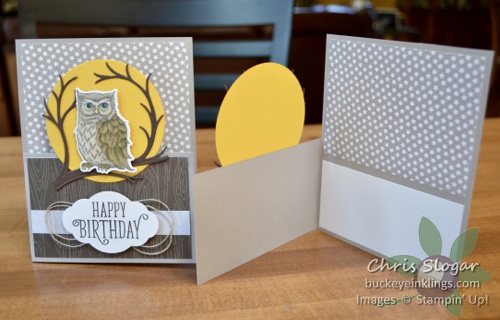
I made a couple of these, on a fun fold card.
Here’s a closer look at the second one…
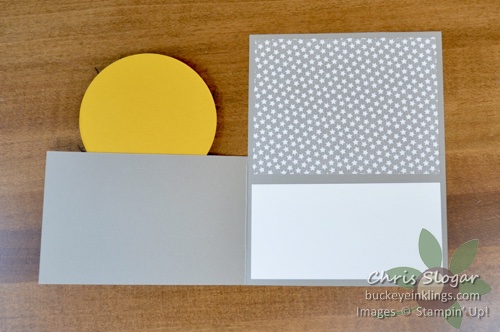
Each card base is made up of two pieces of Gray Granite. The back measures 4 1/4″ x 5 1/2″, and the swinging “barn door” measures 2 3/4″ x 8 1/2″, scored at 4 1/4″. The folding piece is attached to the back.
The starry designer paper measures 4″ x 3″, and it overlaps the seam between the two base pieces, hiding it nicely. The Whisper White piece measures 4″ x 2″.
The wood grain designer paper pieces on the front of the card measures 4″ x 2 1/2″ and 5/8″ x 4″. The Crushed Curry circle is attached to the front panel, with adhesive only on the lower portion.
If you need any of our fabulous products, I would very much appreciate your business in my online store! The Clearance Rack was updated this week, and there are some great deals to be had. Please click here to shop, or use the carousel below to be directed to a product used in today’s project.
Place an order over $35 with this month’s Hostess Code and you will receive a package of All is Bright Paper Clips from me as a thank you! Orders over $50 are also eligible for a Buckeye Point in my Loyalty Rewards Program.