Favorite (and Easy!!) Flower Cards

I was looking through pictures of spring cards I made over the past few years and saw some very easy flower designs that I would like to make again.  Most of the products in these samples are still available, or have a similar current version.  All three are quick and easy, and can be used with many sentiments.

DSCF4836w

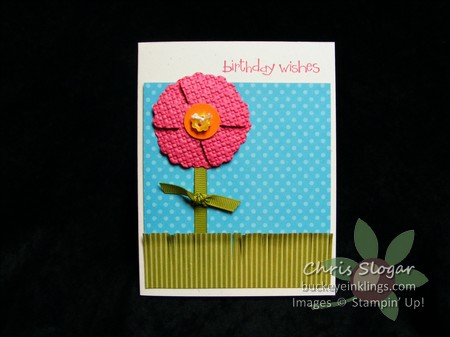
This is from 2011, and it uses the smallest flower from the Fun Flowers Die.  There are actually two of this flower, embossed and placed so that their petals do not line up.  There is a dimensional between the two flowers.  And the grass?  I could have used the fringe scissors back then!

DSCF5684w

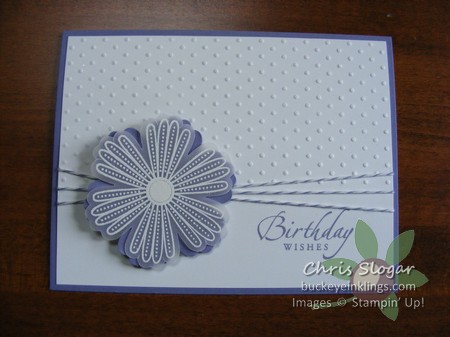
This one from 2012 uses Mixed Bunch with the Blossom Punch – very clean and simple!

DSC_0105w

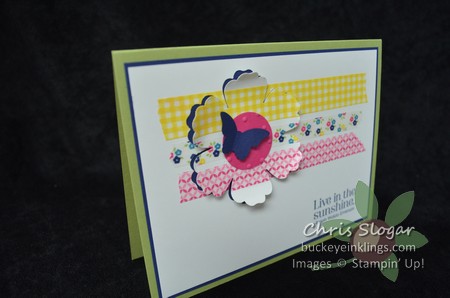
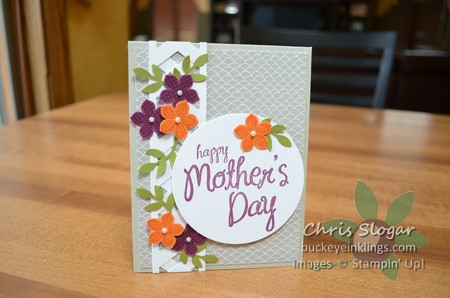
This one is from last year, and it also uses the Blossom Punch.  Just a little Washi Tape makes it so colorful and fun.

Chris_buckeye_signature_rose_final

Another Trellis

DSC_0606w

This is a simple trellis that you can make with the Chevron punch.  I posted some details on making this trellis and a wider trellis last week.  Click here for more details.  This is one of the cards you can make in next week’s Card Buffet, with sessions at noon and 6:30pm on Tuesday and Thursday and 10am on Wednesday.  More details under “Events”, please contact me to register.

Stampin’ Up! is having its first worldwide live-streaming event today on youtube.  You can stamp along with the home office as they present projects using the All Wrapped Up Bundle on page 6 of the Sale-a-bration catalog.  You can count on Stampin’ Up! to present clever ideas for these products.  Tune in at 7:30 PM, 9:30PM or 1AM EST.  There will be door prizes, but you must have a Gmail account to enter comments and be eligible to win.

Click here to go to Stampin’ Up!’s youtube channel.

Chris_buckeye_signature_rose_final

Weekly Deals

The Weekly Deals are shown below.  This will be the last group of Weekly Deals before Sale-a-bration ends.  Every $50 product purchase earns free Sale-a-bration merchandise through March 31.  The free choices are shown on pages 12-17 of the Sale-a-bration catalog in the left sidebar.

Please use Hostess Code EDX6MNS2 to be eligible to earn any Hostess Benefits earned from this week’s order, or contact me by Sunday, March 30 if you would like me to include your items in the group order that I am collecting.  Shipping is 10% instead of the minimum $6.95 when placed with the group.

Silver Glimmer Paper Silver Glimmer Paper Item # 124005
Regular Price: $4.95 US/$5.95 CAN
Discounted Price: $3.71 US/$4.46 CAN
Champagne Glimmer Paper Champagne Glimmer Paper Item # 127885
Regular Price: $4.95 US/$5.95 CAN
Discounted Price: $3.71 US/$4.46 CAN
This And That Epic Day Designer Series Paper This And That Epic Day Designer Series Paper Item # 130814
Regular Price: $10.95 US/$13.50 CAN
Discounted Price: $8.21 US/$10.13 CAN
Soho Subway Designer Series Paper Soho Subway Designer Series Paper Item # 130140
Regular Price: $10.95 US/$13.50 CAN
Discounted Price: $8.21 US/$10.13 CAN
Cajun Craze 8-1/2X11 Card Stock Cajun Craze 8-1/2X11 Card Stock Item # 119684
Regular Price: $6.95 US/$8.50 CAN
Discounted Price: $5.21 US/$6.38 CAN
Brights Core'dinations Cardstock Brights Core’Dinations Cardstock Item # 129953
Regular Price: $23.95 US/$29.95 CAN
Discounted Price: $17.96 US/$22.46 CAN
Subtles Core'dinations Subtles Core’Dinations Item # 129954
Regular Price: $23.95 US/$29.95 CAN
Discounted Price: $17.96 US/$22.46 CAN
Wonderful You Board Book Template -- Digital Download Wonderful You Board Book Template – Digital Download Item # 130130
Regular Price: $14.95 US/$16.50 CAN
Discounted Price: $8.97 US/$9.90 CAN


Chris_buckeye_signature_rose_final

Punch Art Bunnies, Old and New

DSCF5973w

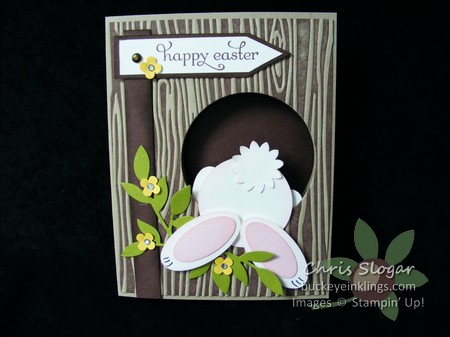
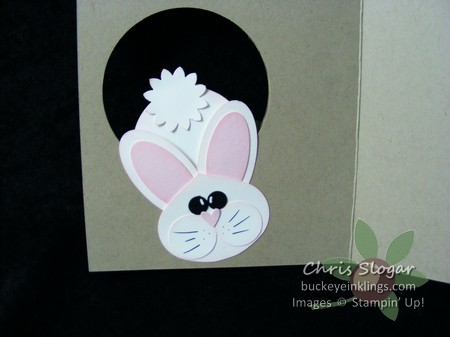
I have had some requests to see this card again, and while I couldn’t locate the actual card, I could find the pictures.  We made this card in a class last year, and most of the products are still current.  Here is the inside of the card:

DSCF5974w

This bunny’s head was made with the retired ornament punch, and the oval for the inner ear and paw is also retired.  You could make a round head, though, or use the heart punch, upside-down.  The inner ears and feet could be done with sponged color.  The greeting is from Delightful Dozen.

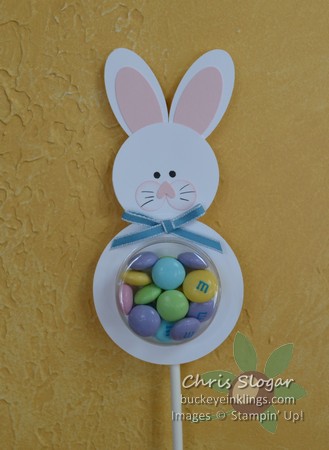
I also have a bunny to show that we made in club last month.  I CASEd this from Joanne Travis.  She used a snowman die for the body, but I found that a combination of 2 1/2″ (body) and 1 3/4″ (head and treat cup opening) circle punches worked, too.  I also added a long stick from the candy-making section of my local craft store so that this guy could stand up in a basket.

Punch Art Treat Cup Bunny

The circles on the bunny’s face are 1/2″, and the heart nose is from the owl punch.  The ears are from the Large Oval, and the inner ear is the smaller, retired oval.  Again, you could sponge the ears, or even use a shape from the Blossoms Petal XL Punch, which is still available on the Clearance Rack.

I have mentioned a few club projects lately, this bunny for instance.  Along with the two basket projects shown below (details in last week’s blog entries), these made up last month’s club projects.  We are starting a new club session in April, which will run for 8 months.  We meet one Sunday each month, with a minimum purchase of $25/month.  Please contact me for more details if you would like to join.

DSC_0566w

Chris_buckeye_signature_rose_final

Hello, Sailor for CCMC295

Hello, Sailor

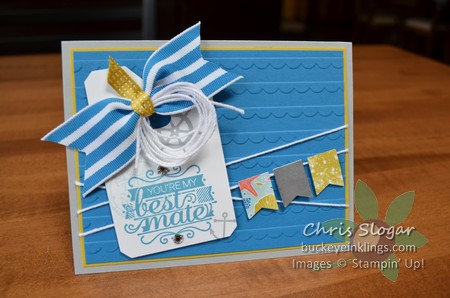
I didn’t expect to make a card for my husband today, but that is how it turned out.  What started out as a plan for a floral card to fit the Create with Connie and Mary Sketch Challenge turned into this.

Here is the sketch:

http://www.createwithconnieandmary.com/.a/6a01310fc1b623970c01a5116dee83970c-pi

I knew I wanted to use banners on twine to create the three lines, and I was struck by how nautical it looked.  “Hello, Sailor” was also on my mind after a conversation with a customer.  From that point, it was just a matter of pulling together some coordinating accessories.  I wish I could’ve shown off more of the High Tide designer paper – you know how I love designer paper!

Sailing was my husband’s favorite pastime once upon a time, and I have made many nautical cards.  But for some reason, it was this coiled twine that brought back memories.  (Here I go again!)  I can just see the coiled lines on the docks!  I will try to find a throwback picture from our sailing days for my next “Hello, Sailor” card.

You can check out more designs for this sketch at Create with Connie and Mary.

Chris_buckeye_signature_rose_final

Sweet Sorbet Basket

Sweet Sorbet Basket

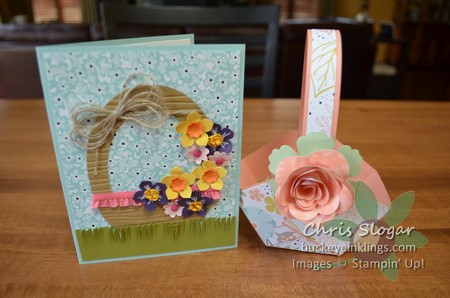
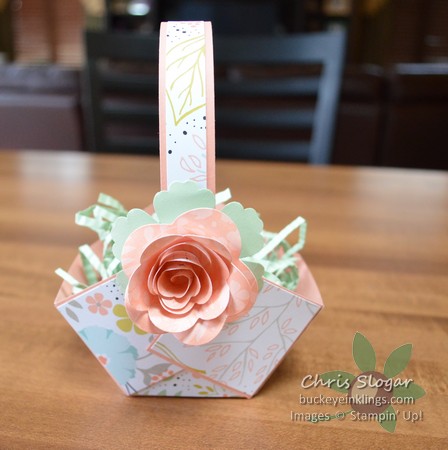
According to the calendar, spring has officially arrived.  Woohoo!  Won’t spring flowers be so much sweeter this year after that brutal winter?  Along with the flowers come events – showers, Easter, and Mother’s Day to name a few.  Today I have a quick and easy basket for you that would suit many occasions.

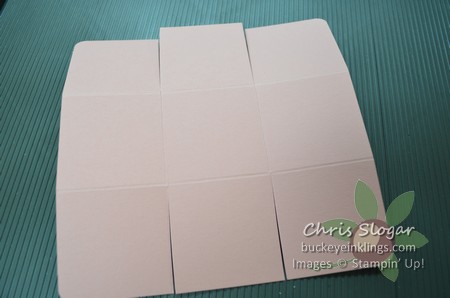
The basket itself requires no special tools or dies.  You could probably make one within 5 minutes using what you have on hand.  It is made from a 6″ square of cardstock, scored at 2″ and 4″ in each direction.  Trim along the score lines in four places as shown in the picture below.

DSC_0589

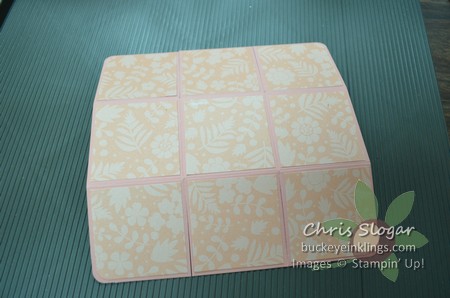
Round the four outside corners and add 1 7/8″ squares of designer paper to each section.  (The picture below shows a different print than what was used in my finished project picture.)  Don’t forget to round a single corner on four of the designer paper squares to match the outer corners of the cardstock.

DSC_0591

That’s basically it – just bring the corner pieces toward each other and attach them to the middle piece on the two cut sides to form the basket bottom.  Add a 3/4″x10″ handle decorated with a 1/2″x10″ piece of designer paper.  I always use sticky strip on these 3D projects.

 I added a flower cut from coordinating paper with the Spiral Flower Die.  The paper is Sweet Sorbet designer paper, one of the freebies in the Sale-a-bration catalog.  It is perfect for spring projects, and you can get a free pack with a $50 purchase.  The leaves are from the Blossom Punch.

You can alter the size of this basket by starting with a smaller or larger square – just score at third points in each direction and cut designer paper to fit the panels.

Chris_buckeye_signature_rose_final

Oval Framelit Basket

Oval Framelit Easter Basket

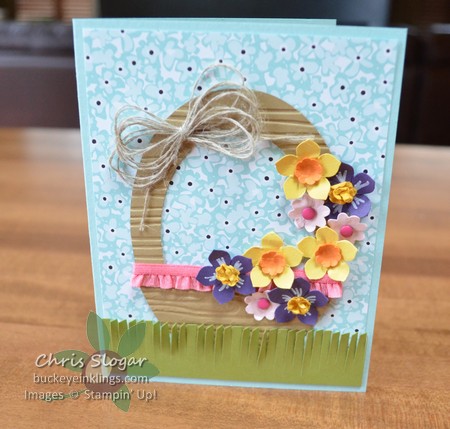
I love this basket that I found on Peggy Noe’s site!  I had to recreate it, and mine is almost an exact copy.  I only changed the flower types to experiment with daffodils and violets.  Click here to see her original.  I knew my club would love this as much as I do, so this was one of our projects this month.

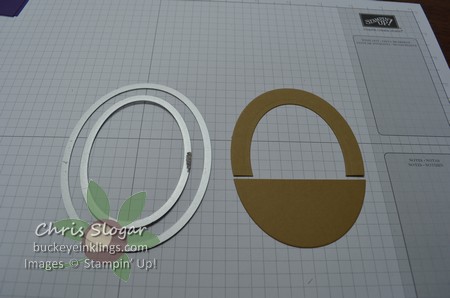
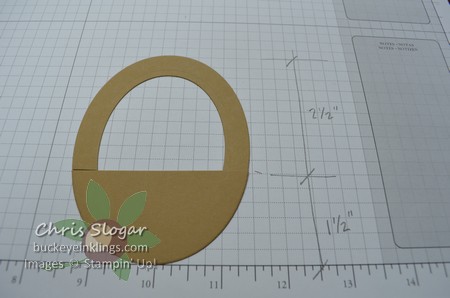
I just wanted to show some detail about how to make the basket; the pictures below show the pieces.  I used the third from largest and third from smallest oval framelits.  In the set of seven oval framelits, there is one size in between these two that I did not use.  The larger oval is about 4″ high.

DSC_0586

I cut a ring with both framelits for the handle and an oval from the bigger framelit for the basket.  They are not cut in half, though.  I cut the handle about 2 1/2″ and the basket is smaller at 1 1/2″.

DSC_0587

Once you have the basket shape, deocrate and add flowers!  My daffodils are from the Petite Petals punch and one of the Punch Pack flowers.  The violets use those same punches – the center is just distressed with water so that the cardstock layers could be separated.

Thank you to Peggy Noe for this great design!

Chris_buckeye_signature_rose_final

Spring Challenges

http://www.createwithconnieandmary.com/.a/6a01310fc1b623970c01a3fcbe3b12970b-pi

http://4.bp.blogspot.com/-NNZQaovHJRU/UyNf6obDLNI/AAAAAAAAI28/96mlHGXBNjY/s1600/pp187.jpg

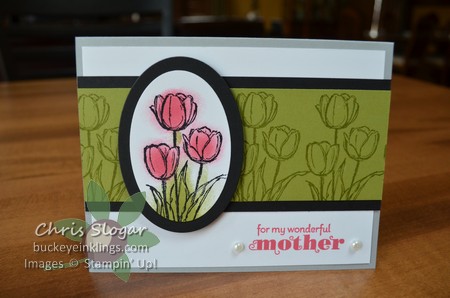
Strawberry Slush is definitely in my Top 5 favorite colors right now, so I was excited to see it paired with Old Olive and Basic Black in the Create with Connie and Mary Color Challenge.  My mind went right to the tulips in the Blessed Easter stamp, and it looks like Deb Currier on the Design Team had the same idea.

I had planned to color the tulips with my blender pen.  As it turns out, I am just not that good at subtly shading an image with my blender pen or markers – the proof is in my trash can.  My tulips were turning out nothing like Deb’s!  I will definitely benefit from the new Blendabilities marker line when they become available.

I considered watercoloring, but then thought it would be nice to simply have color in the general area of the tulips, not necessarily “in the lines”.  The Happy Watercolor brushstroke stamps didn’t fit my oval too well.  In the end, I was happiest with the effect I got from my daubers.  I pounced more color right at the base of each flower, and only pounced lightly outside of that area.  I did the same where the leaves come together.

Blessed Easter Tulips

While I had all of my Strawberry Slush designer papers, embellishments and cardstock ready to go, this turned out Clean and Simple.  I even removed an extra Strawberry Slush mat because it was distracting.  I think that limiting the Strawberry Slush to the tulips and greeting was the way to go.

There are so many great cards in each of these challenges.  You can check out more Color Challenge inspirations at Create with Connie and Mary and more Clean and Simple Spring cards at The Paper Players.

Chris_buckeye_signature_rose_final

Spring is in the Air

DSC_0546w

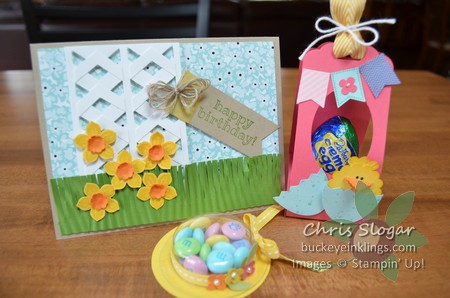
Spring is actually not in the air…that is just wishful thinking.  Spring has been in my craft room over the past week, though!  With a Team Meeting on Saturday and Club Meetings on Sunday, I have been immersed in spring projects.  We made these three projects at our Team Meeting on Saturday.

I will get into details of the projects below, but first let me just say that if you have ever considered joining Stampin’ Up!, now is a good time.  The Sale-a-bration special is on through March 31.  This special allows you to choose $150 in product for $99 with FREE SHIPPING.  I would love to have you on my team!  You don’t have to sell; many people join just for the discount on their own orders (and for the Team Meetings? 🙂 )

New demonstrators are also given a 30% discount off their first qualifying order placed within 45 days of joining.  If you join in the last days of March, this 45 days will stretch into early May when you can get the new In Colors and other pre-order products using this 30% discount.  Please contact me if you would like to discuss this.

Now, the projects…
DSC_0547w

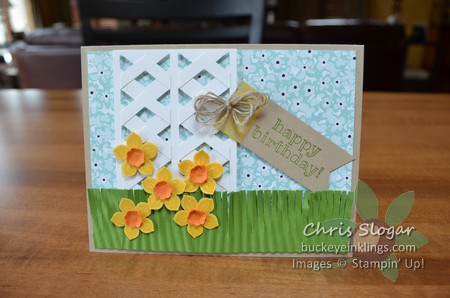
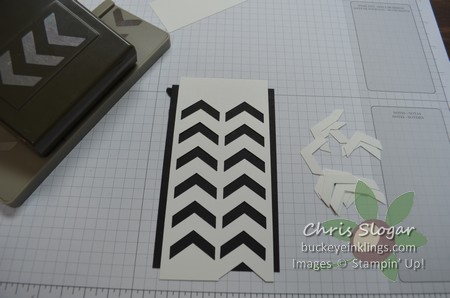
You can make some really great trellises with the Chevron Punch.  To make this one, I cut a strip of Whisper White 2 3/8″ wide and punched a line of chevrons from each side.
DSC_0592

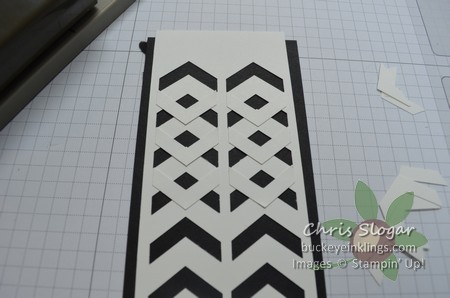
I took the pieces that were punched out and attached them in the opposite direction.
DSC_0593

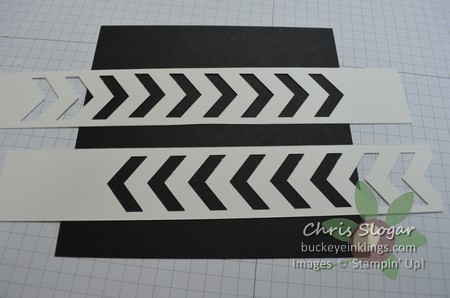
If you would like a “single chevron trellis” (not shown on this card), there is an even easier way to do that.  Punch chevrons on 1 1/4″ strips.
DSC_0594

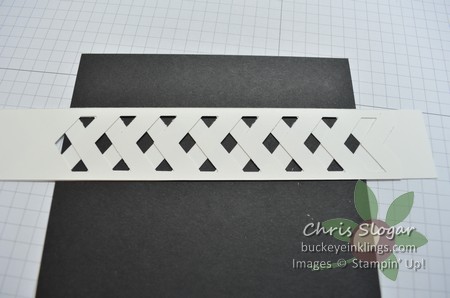
Slide one strip over the other and attach.
DSC_0595

I crimped and fringed the grass.  The greeting is from a set that will be in the upcoming 2014-2015 Annual Catalog, So Very Happy, and I added a little Washi Tape for interest.  I used the Petite Petals Bundle and one of the Punch Pack flowers for the daffodils.
DSC_0551w

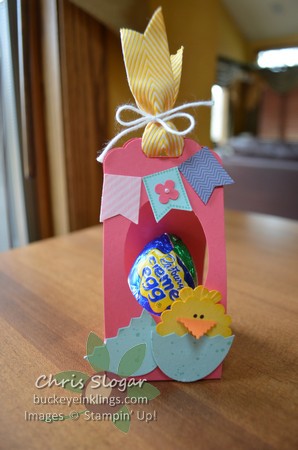
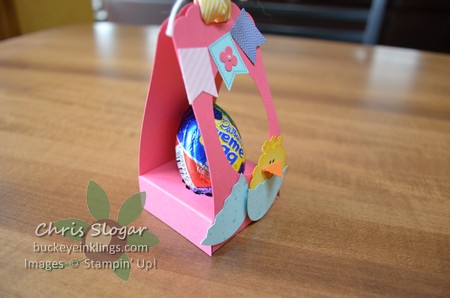
Next, this is a little gem that I CASEd from Connie Stewart.  I already talked about this cute chick on last week’s Chick Throwback post, but I also loved Connie’s little egg throne (as she called it).  You can get a better idea of its construction from a side view.
DSC_0555w

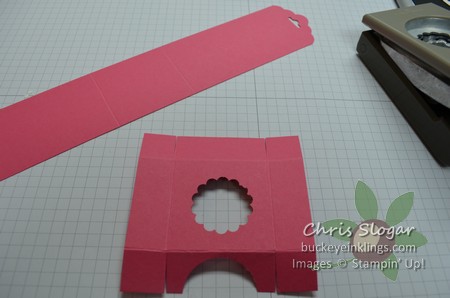
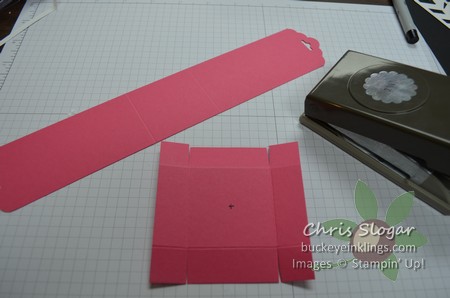
It is basically made from two pieces, a 2″x11″ piece, scored at 4 1/2″ and 6 1/2″ and a 3 1/2″ square, scored at 3/4″ on all sides.  I used Strawberry Slush.
DSC_0596

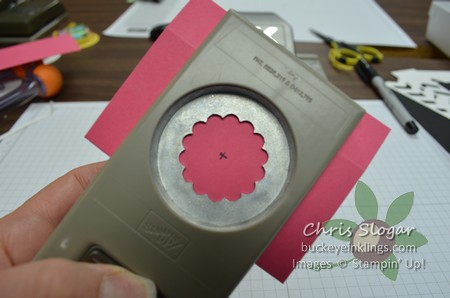
I made a little mark in the center of my throne piece to make it easy to find the center when punching.
DSC_0597

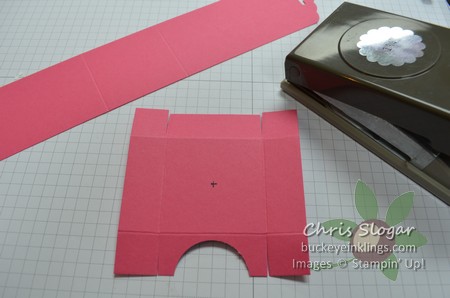
You will want to nip out a semicircle with a circle punch so you don’t end up punching through two layers of cardstock when you make the scalloped circle for the egg.  (Punching through two layers of cardstock will damage your punch!  I have had this experience!  Don’t do it!)  This is the 1 1/4″ scallop circle punch.
DSC_0598 DSC_0599

Connie made a video on this project, and her throne is made in Perfect Plum and decorated with the egg from “Eggstra Spectacular”, also super-cute!  Click here to go to her website for more inspiration and a video.

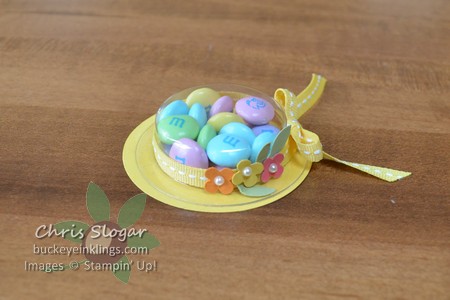
Our final project was this little Easter Bonnet, inspired by Vicky Hayes.  So cute, and so easy!!
DSC_0558w

The circle size is 2 1/2″, and once the treat cup with candy is attached, I recommend sticking the ribbon to the front of the treat cup with a glue dot.  Then you can tie the bow in the back without having it slip off!

And if you made it to this point, a big thank you for staying with this long post!!  Have a great day!

Chris_buckeye_signature_rose_final

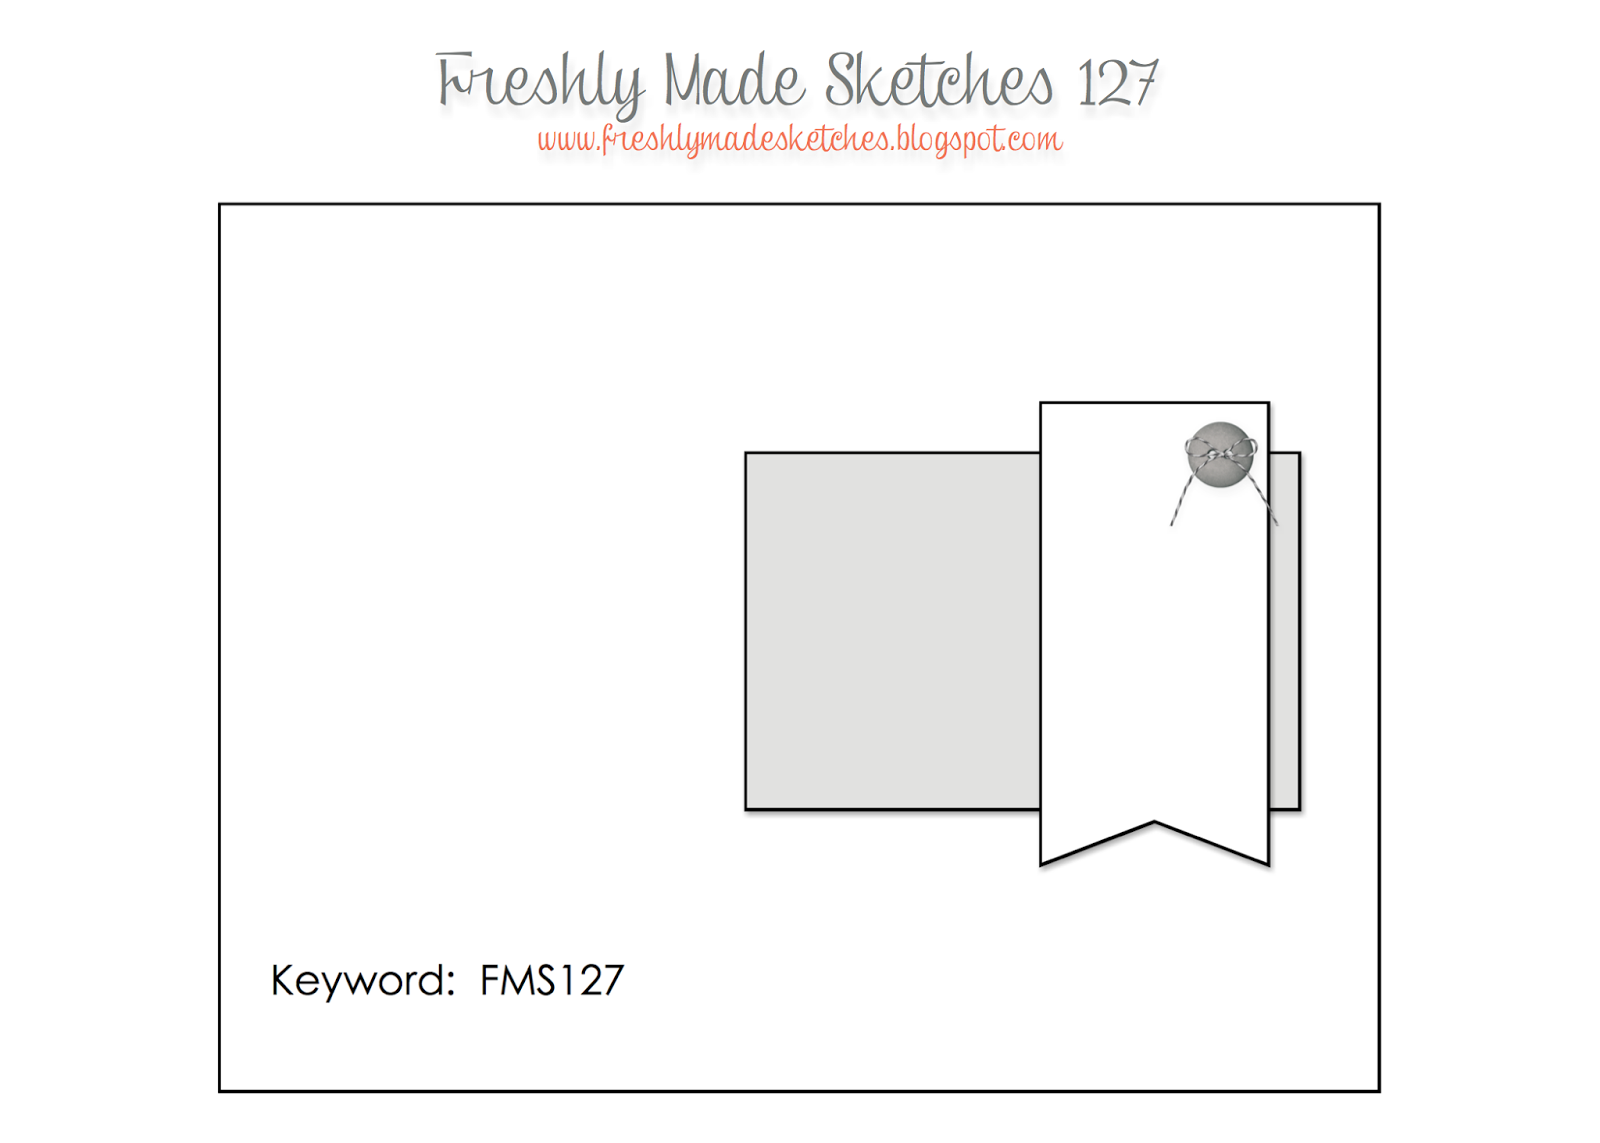
Freshly Made Sketches 127

FMS Final 127-001

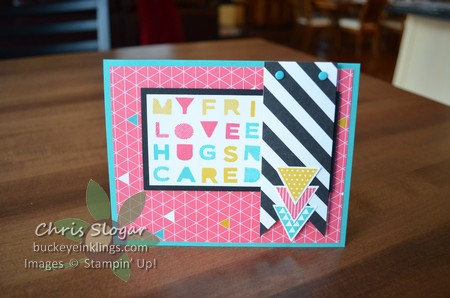
In this layout, Jen T. gives us a great way to highlight a small element on the right side of this card.  However, in my version, the matted piece under the banner grabs the attention.

Sans & Stripes

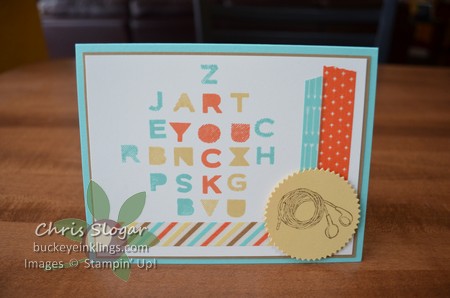
Hopefully, the letters for “LOVE YOU” jump right out at you.  That is the main message, but I also played around with the placement of the other letters to make other hidden words.

The letters are from the photopolymer set Sans & Stripes.  They coordinate nicely with the Kaleidoscope designer paper and the Geometrical stamp set.  These letters would be a fun background even if they were placed randomly and didn’t spell anything.  Of course, they are great for personalizing cards and scrapbooking, too.  How many times do we need a different word than we have available?

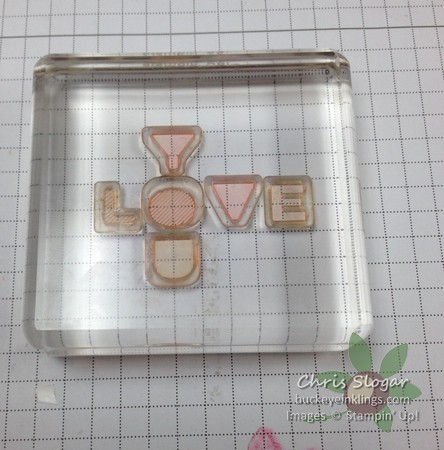
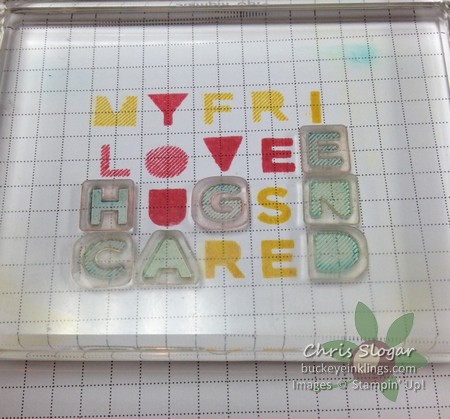
It is easy to lay out the Sans & Stripes letters on grid paper.  Keep scrolling for pictures of the process.

photo 10

The letters occupy a 1/2″ square.  I lay out the message first, placing the letters face down.  When I am happy with the message, I just pick them up with my block.

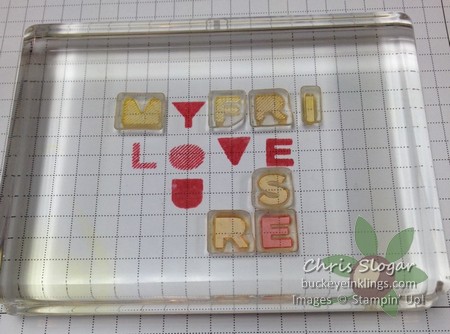
photo 13

I stamp the message and then build around it.  Having the message stamped on the grid paper helps if you are trying to add other words.

photo 14

Keep filling in letters until your grid is the size you want.  It’s fun to use color to highlight the main message.  I also did that in the following example, and I hope you can see the message.  My family didn’t get it right away, but they are not into word puzzles like I am!  The irregular border around the grid of letters is a nice contrast to the very organized grid.

DSC_0502w

You can check out more designs that are based on this sketch at Freshly Made Sketches.  Have a great weekend!

Chris_buckeye_signature_rose_final
WordPress theme: Kippis 1.15